Content Index
- The Choice of Genre and the Learning Curve
- Platform Rotation with rotation movement
- ⚠️ The Challenge
- 1. ⚙️ Implementation: The Key Component
- 2. Blueprint Logic (BeginPlay Event)
- 3. Test and Result
- ️ Video Game Development: Moving Platform (A to B) in Unreal Engine
- 1. Visual Configuration and Blueprint
- 2. Cyclic Movement Logic
- a. Start of Movement
- The Cycle (A to B)
- 3. Scope and Customization
- Pad platform with automatic A to B movement with: move component to
- 1. ⚙️ Movement Logic (Move Component To)
- 2. Movement Cycle
- Pad platform with circular movement Unreal Engine 5 - Rotation movement
- 1. ⚙️ Components and Configuration
- 2. Rotation Logic (Event BeginPlay)
- Automatic A to B jump platform
- 1. Components and Structure
- 2. Collision Logic (Event Graph)
- 3. ⏱️ Solution to the Race Condition (Delay)
- Platform with automatic A to B movement with Interp to Movement
- 1. ⚙️ Main Component and Configuration
- 2. Dynamic Logic: Construction Script
- 3. Integration of Child Platforms
- 4. ⚖️ Event Comparison (Construction vs. BeginPlay)
- Pad with Automatic Fall After a Time in Unreal Engine
- Part 2: Falling Platform with Reset
- 1. ⚙️ Behavior and Variables
- Blueprint Logic
- Slippery Surface in Unreal Engine 5
- 1. ️ Visual Configuration and Collision
- 2. Movement Modification Logic
- Platform Rotation with Rotation Movement
- 1. ️ Components and Configuration
- 2. Movement Logic (Event Graph)
- Inheritance in Blueprint Classes or Child Blueprints, Moving BPs Together in Unreal Engine 5 Runtime
- 1. Failed Inheritance (Movement Applied to Mesh)
- 2. Successful Inheritance with New Component
I want to show you the first progress I've made in the development of my first video game, with the hope that at some point it will cease to be a prototype and become a commercial product.
I share this process with you because, if you also plan to develop your first game (especially in 3D with Unreal or Unity), this approach to prototyping can be very useful for you.
The Choice of Genre and the Learning Curve
a. Platformer Games: The Best Option to Start
I recommend starting with a platformer type video game because of its simplicity and modularity.
- Modularity: The scenario is built as a hallway-type level where the logic lies in the functionality of the platforms and obstacles (the Blueprints).
- Manageable Complexity: It is much simpler to manage than an RPG or a Shooter (which require complex logic for enemies and weapon systems).
b. Unreal Engine and Learning
Unreal Engine has a steep learning curve, but the most effective method is:
- Do small practices and watch basic courses (I will share resources later).
- Once you've learned the basics, create a clean project and replicate the learned functionalities on your own.
Now, we will see how to implement several platforms for a platformer type game with Unreal Engine 5.
Platform Rotation with rotation movement
Continuing with the presentation of my first attempt at a commercial video game in Unreal Engine, today I show you how I implemented a rotating platform.
⚠️ The Challenge
This type of platform is surprisingly complex, as constant movement makes it difficult for the player to jump or land on them. If we adjust the rotation speed, the difficulty level can increase to the point of being frustrating (but fun, if that is the goal).
1. ⚙️ Implementation: The Key Component
The implementation is very simple, as Unreal Engine provides us with a native component for this purpose.
a. Blueprint Configuration
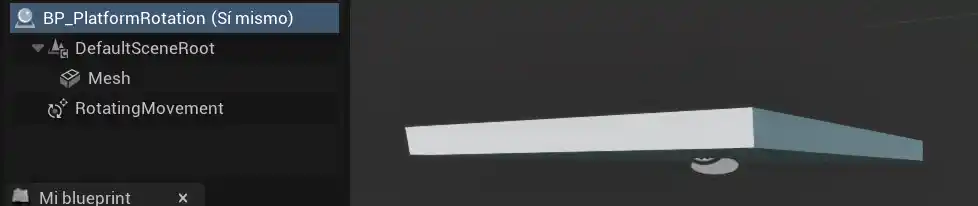
- Actor Creation: My Blueprint is called BP_PlatformRotation.
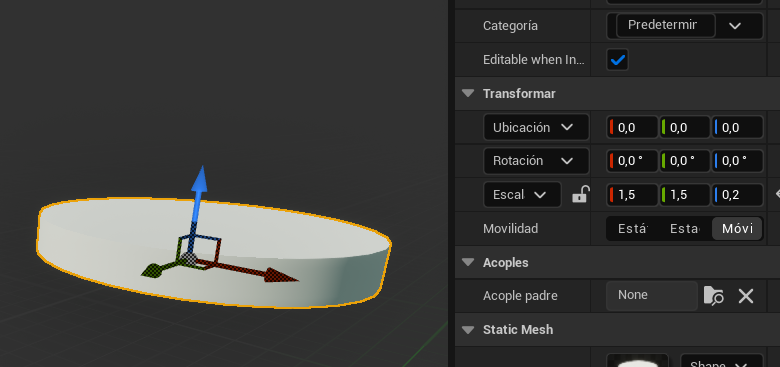
- Visual Definition: I added a Cube to the Viewport and modified its scale to flatten it (scale: 2, 3, and 0.2 on Z) so it looked like a platform.
- Essential Component: The secret is to add the Rotation Movement component (found in Add Component > Rotation Movement).
This component is responsible for determining how much and how the actor will rotate.
b. Exposure of the Speed Variable
To easily control the rotation speed from the Unreal editor, I created a variable:
- Variable: RotationZ (Float Type).
- Default Value: I set it to 90.
- Editing: I marked the variable as Editable (the open eye) to be able to modify it directly in the editor's Details window.
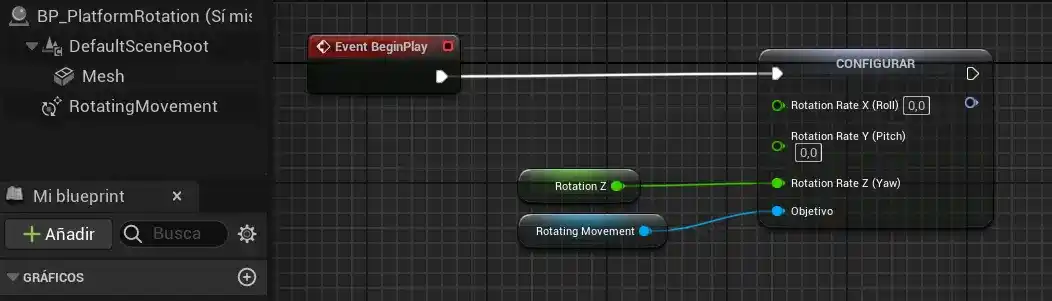
2. Blueprint Logic (BeginPlay Event)
The logic in the Blueprint is minimal, as we delegate almost all the functionality to the Rotation Movement component.
- Event: I used the Begin Play node. This node executes only once when the game starts, which is exactly the behavior we need to establish the platform's movement.
- Target and Speed:
- I dragged a reference of the Rotation Movement component to the graph.
- I used the Set Rotation Rate node (which only appears if you drag it from the Rotation Movement instance). This node sets the rotation speed.
- Axis Configuration:
- I connected the editable RotationZ variable to the Z axis of the Rotation Rate. This indicates that the platform will rotate on its own Z axis (vertical).
Clarification on Rotation Rate: Although I initially thought that Rotation Rate indicated the amount of degrees to rotate, in reality, it acts as the speed of rotation per second. By changing the value from 90 to 180, the platform rotated twice as fast.
3. Test and Result
Upon hitting Play, the platform rotates at the defined speed (90 by default).
Modification: If I access the Details tab and change the RotationZ value to 180, the platform rotates twice as fast, making the jump much more difficult.
This way, you can implement a functional rotating platform very easily, leveraging Unreal Engine's native components. Remember: the limit is your imagination.
Platform with automatic A to B movement
Hello! I have improved the wording of your text, structuring the explanation of the moving platform (A to B) in Unreal Engine, detailing the key component, the Blueprint logic, and the cycle flow.
️ Video Game Development: Moving Platform (A to B) in Unreal Engine
We continue with the purpose of showing you how to develop your first platformer video game. In this video, I will explain the implementation of a moving platform that cyclically shifts from point A to point B.
This is one of the first platforms I created for the project and, although there are simpler ones, this is a fundamental pillar in any platformer game (like Crash or Mario).
1. Visual Configuration and Blueprint
The platform's Blueprint, which is in my My Blueprints/Plataformas folder, contains the movement logic.
a. The Mesh (Flattened Cylinder)
- Geometry: The Viewport shows a cylinder that has been flattened.
- Scaling: To get the platform shape, I scaled the cylinder on the X and Y axes, and reduced the scale on the Z axis to 0.2 so it would be compressed.
- Rename: The cylinder mesh is renamed as Platform Mesh.
b. Key Variables
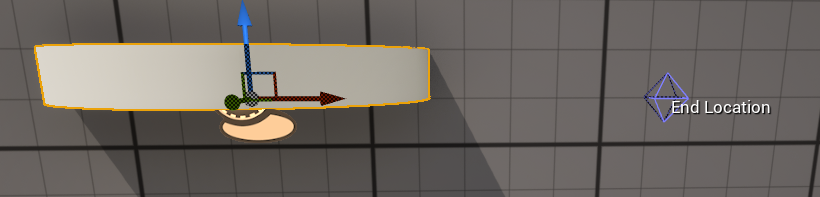
End Location Vector (Vector 3D) Editable and Show 3D Widget Represents the final position (B) to which the platform will move. The 3D widget allows manipulating the destination directly in the editor.
Start Location Vector (Vector 3D) Not Editable The initial position (A). It is calculated, but relatively, so it is usually $(0, 0, 0)$.
Move Duration Float Editable The time it takes for the platform to go from A to B.
Stop Duration Float Editable The time the platform will be paused upon reaching each end (A or B).
2. Cyclic Movement Logic
The platform's animated movement is managed through the Event BeginPlay event and a specialized node.
a. Start of Movement
The flow begins in Event BeginPlay (the event executes only once when the Blueprint is constructed in the level).
- Initial Pause (Delay): I use a Delay node to pause the thread during the Stop Duration (by default, $2$ seconds), preventing the platform from moving immediately when the game starts.
- Animated Movement: The key component is the Move Component To node.
- This node is ideal for moving a component progressively (animated), not immediately.
- Component: The Target is the Platform Mesh.
- Destination: It moves towards End Location (position B).
- Duration: The movement is carried out during the time defined in Move Duration.
Important (Relative Movement): This node uses the relative position (Target Relative Location), not global. This greatly simplifies the logic, since the initial position (A) is always $(0, 0, 0)$ relative to the Blueprint.
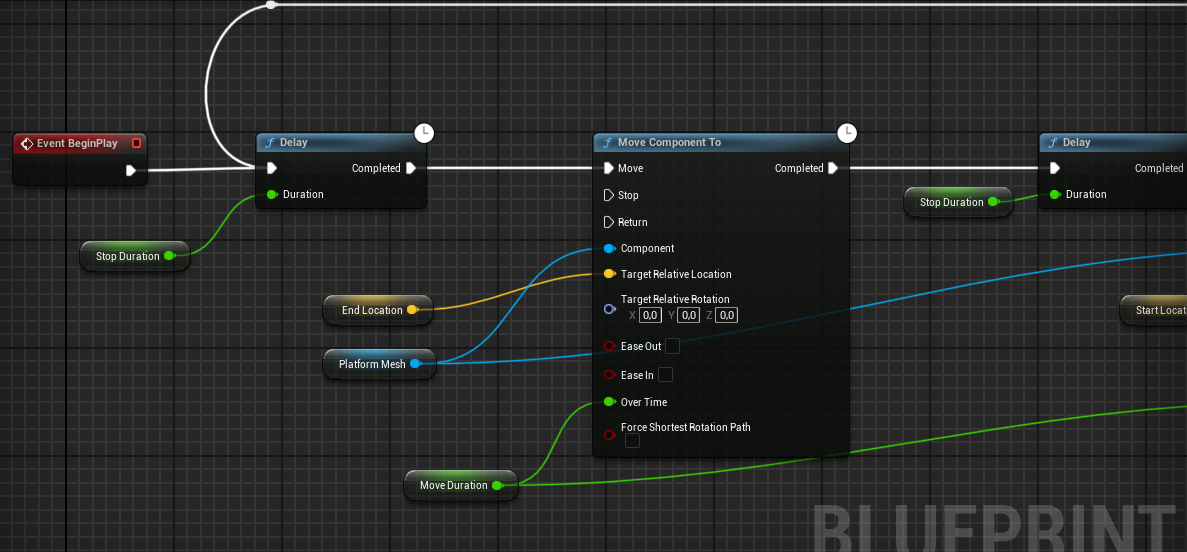
The Cycle (A to B)
The platform goes from A to B, and from B to A, creating a continuous cycle:
- Arrival at B: Once the Move Component To finishes, a second Delay node is executed (again using the Stop Duration) to pause the platform at point B.
- Return to A: After the pause, another Move Component To node is used to move the platform back to its initial position, Start Location (position A), using the same Move Duration.
- Loop: Once the return to A is complete, the execution returns to the first Delay, restarting the cycle.
3. Scope and Customization
With this simple logic, we already have a complete behavior that we can customize:
- Difficulty: Vary the Move Duration to speed up or slow down the platform.
- Route: Since End Location is a Vector 3D, the movement is not limited to the X axis; we can make it move on the Y and Z axes (vertically) or diagonally.
This demonstrates that with basic components and simple logic, complex functionalities essential for any platformer game can be created.
Pad platform with automatic A to B movement with: move component to
I am going to explain how to create a Blueprint for a platform or wall that slides from an A position to a B position, based on the actual size of its mesh. This type of object is perfect for recreating obstacles, like the walls that hit the player in games like Crash Bandicoot.
Initial Blueprint Parameters
The Blueprint is designed to be configurable from the Unreal editor. The key parameters we must adjust are:
- Loop (Boolean): Determines whether the movement will repeat in a continuous loop or stop when reaching the destination.
- Initial Delay (Float): The time the object will wait before starting to move.
- Displacement Factors (Vector X, Y, Z): Indicates the multiplication factor for movement on each axis (e.g., if it is 1 on X, it will move once the size of the box on X).
Espanol a ingles
Gem personalizado
Hello! I have improved the wording of your text block, organizing the explanation of the sliding platform's Blueprint and the use of the Move Component To node based on the mesh's dimensions.
Video Game Development: Sliding Platform with Relative Dimensions
In this video, I am going to explain how to create a Blueprint for a platform or wall that slides from an A position to a B position, based on the actual size of its mesh. This type of object is perfect for recreating obstacles, like the walls that hit the player in games like Crash Bandicoot.
Initial Blueprint Parameters
The Blueprint is designed to be configurable from the Unreal editor. The key parameters we must adjust are:
Loop (Boolean): Determines whether the movement will repeat in a continuous loop or stop when reaching the destination.
Initial Delay (Float): The time the object will wait before starting to move.
Displacement Factors (Vector X, Y, Z): Indicates the multiplication factor for movement on each axis (e.g., if it is 1 on X, it will move once the size of the box on X).
1. ⚙️ Movement Logic (Move Component To)
The main functionality is achieved using the Move Component To node, which we have already used in other platforms.
- a. Preserve Rotation
Target Component: The movement target is the Platform Mesh. - Keep Rotation: In the node, we set the current rotation of the mesh. This is vital to preserve any rotation we have manually applied to the Blueprint in the editor. If not preserved, the component would assume a zero rotation, losing the desired orientation.
b. Relative Displacement Calculation
The heart of this Blueprint is calculating the destination (position B) based on the object's dimensions, which allows the movement to be proportional to the platform's size.
- Get Dimensions: We use the Get Actor Bounds node. This returns the actual size of the actor's mesh bounding box (the box dimensions).
- Multiplication by the Factor: We multiply the value of the box size by the Displacement Factor variable (which comes from the editor).
- Example: If the box measures 200 units on X, and the Factor is 1, the total displacement will be 200 units. If the Factor is 2, the displacement will be 400 units.
- Final Destination: The result of the multiplication is the relative displacement that we pass to the Move Component To node.
2. Movement Cycle
Once the object has moved, the Blueprint manages the pause time and the return to the initial position (A).
- Pause at B (Delay): When the movement to B finishes, a Delay node is introduced to pause the execution for a defined time (the closing delay).
- Return to A: The Move Component To node is called again.
- Destination: In this case, the displacement is set to zero in the factors. This tells the component to return to the initial or original position (position A).
- Pause at A (Delay): Once back at A, another Delay is introduced for the final pause.
- Loop Control:
- If the Loop variable is True, the execution returns to the beginning of the cycle (to the first Delay).
- If it is False, the execution stops.
With these steps, we have created a simple but robust Blueprint, ideal for obstacles that move proportionally to their size:
Pad platform with circular movement Unreal Engine 5 - Rotation movement
I show you how you can create the following platform. It is a simple object that rotates on its own axis at a controllable speed, a classic obstacle in any platformer game.
1. ⚙️ Components and Configuration
The Blueprint for this platform is one of the most straightforward to implement.
a. The Mesh and Main Component
- Mesh: I use a cylinder whose scale has been modified to 0.2 on the Z axis to make it look like a flattened surface.
- Movement Component: The rotation functionality is delegated to the Rotation Movement component. You simply need to add it to the Blueprint through the Add Component option.
b. Control Variable
To make the platform configurable, I exposed a single variable:
- Variable: Velocity (Float Type).
- Purpose: This variable determines the platform's angular speed. If the value is 20, and you double it to 40, the platform will rotate twice as fast.
2. Rotation Logic (Event BeginPlay)
- The rotation configuration is done at the beginning, in the Event BeginPlay event.
- Component Reference: We get a reference to the Rotation Movement component that we previously added.
- Set Speed (Set Rotation Rate):
- We drag the Set Rotation Rate node from the Rotation Movement component reference. This node is the one that controls the rotation speed.
- Target: The Target is the Rotation Movement component.
- Apply Speed to the Z Axis:
- We connect the Velocity variable directly to the Z axis of the Set Rotation Rate node.
- Result: This makes the object rotate on its Z axis (the vertical axis), which is precisely what is desired in a rotating platform.
- Other Axes: The X and Y axes are kept at zero, as we do not want the platform to rotate on those axes (if we applied a value, for example, on Y, the platform would rotate and tip over, which could be useful for another type of obstacle, but not for this one).
In this way, with just one component and the speed definition, you have a rotating platform ready to use.
Automatic A to B jump platform
I will show you how to create a Blueprint for a Jump Platform ( or Jump Pad). Upon coming into contact with it, the character is automatically propelled to a predefined height.
1. Components and Structure
The platform is defined by two key elements that work together:
- Platform Mesh: The visual component (in this case, a flattened cylinder with a 0.2 scale on Z).
- Box Collision (Collider): The collision detection area.
- Implementation: It is added as a Box Collision inside the Mesh.
- Scaling: It is important to scale it so that it protrudes slightly from the mesh, ensuring effective collision detection.
2. Collision Logic (Event Graph)
The jump functionality is based on two Box Collision events: On Component Begin Overlap (upon starting the collision) and On Component End Overlap (upon ending it).
a. Key Variables
The Blueprint has an essential variable for customization:
Jump Z Factor (Float): A factor that allows modifying the platform's jump height. If the factor is 5, the jump will be much higher than the character's default value.
b. Collision Start Event (On Component Begin Overlap)
This event manages the jump impulse:
- Actor Detection: The node returns the Other Actor that touched the platform.
- Casting to Character: It is crucial to Cast the Other Actor to the playable character (in my case, ThirdPersonCharacter or Reina). This ensures that only the player activates the logic and gives us access to its functions.
- Movement Access: We get a reference to the Character Movement component of the Casted character.
- Jump Speed Adjustment:
- Calculation:
- We multiply the character's base jump value (by default, the Jump Z Velocity) by our Jump Z Factor (e.g., $200 * 5 = 1000$).
- Application: We use the Set Jump Z Velocity node to apply this new jump value to the character.
- Calculation:
- Jump Execution: Finally, we call the character's Jump function so that it is propelled.
c. Collision End Event (On Component End Overlap)
This event is essential to reset the jump to its original value once the character leaves the platform. Without this, the character would retain the ability to perform powered jumps even outside of it.
- Casting and Movement: The same casting is performed and the character's Character Movement is obtained.
- Speed Reset:
- Inverse Calculation: We divide the character's current jump speed (which is the boosted one, e.g., 1000) by the Jump Z Factor (e.g., $1000 / 5 = 200$).
- Application: This value (200) is applied again to the character's Jump Z Velocity.
- Precision Warning: It is vital to use values that do not generate infinite decimals when multiplying and dividing, to avoid precision problems in the jump factor.
3. ⏱️ Solution to the Race Condition (Delay)
There is a common problem where the jump is not activated if the character touches the platform while already in the air (unless they are just in contact with the ground). This is an internal Race Condition in Unreal.
- Solution: To mitigate this, I inserted a small Delay (0.05 seconds) just after the successful casting.
- Purpose: This delay gives the system time for the character's internal variable (IsFalling or similar), which controls whether they can jump or not, to reset, allowing the Jump function to execute correctly.
With these steps, you have a flexible and reusable jump platform, ready to add verticality to your levels.
Platform with automatic A to B movement with Interp to Movement
I'm going to show you a second implementation for a platform that moves from point A to point B. This version is much simpler to code, as it uses the native Unreal Engine component, Interp To Movement, which automates much of the process.
1. ⚙️ Main Component and Configuration
- The Interp To Movement component (similar to Rotation Movement) manages linear movement between multiple points.
- Implementation: You simply add the Interp To Movement component to the Blueprint.
- Control Points: This component allows defining the relative positions to which the platform will move.
- Static Mode: If you disconnect the script, you can define the movement points directly in the component's Details panel (for example, defining several points on the X, Y, or Z axis).
- Ping Pong Mode: You can configure the Ping Pong option so that the platform moves in a constant cycle between the last and the first defined point.
- Limitation: In my opinion, the main disadvantage of this component is that it does not offer an obvious way to add a pause or Delay at the final points (A or B).
Espanol a ingles
Gem personalizado
Of course! I have improved the wording of your text, structuring the explanation of the moving platform with the Interp To Movement component, highlighting its advantages, limitations, and the difference between using Construction Script and Event BeginPlay.
Moving Platform with Interpolation (Interp To Movement)
I'm going to show you a second implementation for a platform that moves from point A to point B. This version is much simpler to code, as it uses the native Unreal Engine component, Interp To Movement, which automates much of the process.
1. ⚙️ Main Component and Configuration
The Interp To Movement component (similar to Rotation Movement) manages linear movement between multiple points.
Implementation: You simply add the Interp To Movement component to the Blueprint.
Control Points: This component allows defining the relative positions to which the platform will move.
Static Mode: If you disconnect the script, you can define the movement points directly in the component's Details panel (for example, defining several points on the X, Y, or Z axis).
Ping Pong Mode: You can configure the Ping Pong option so that the platform moves in a constant cycle between the last and the first defined point.
Limitation: In my opinion, the main disadvantage of this component is that it does not offer an obvious way to add a pause or Delay at the final points (A or B).
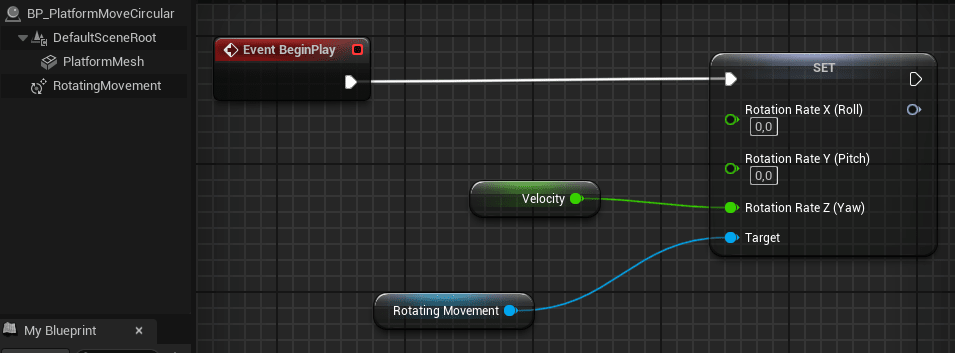
2. Dynamic Logic: Construction Script
Although we could use the Event Graph (Event BeginPlay), I used the Construction Script to dynamically add the control points and link the movement to an external variable (the 3D Widget).
a. Movement Initialization
- Component Reference: We get the Interp To Movement component.
- Movement Time: We initialize the component's Duration with my Move Duration variable. This defines the time it will take to travel all the control points.
b. Dynamic Point Definition
We use the Add Control Point Position function of the component to define the trajectory:
- Point A (Origin): We add the relative position $(0, 0, 0)$.
- Point B (Destination): We add the position defined by the End Location (the vector variable exposed with the 3D Widget).
3. Integration of Child Platforms
The main reason for looking for this implementation was to ensure the integration of child Blueprints.
- Problem: If we want a block or an enemy to move together with the platform, it must be a child of the moving platform.
- Solution: By moving the moving platform within the level (the root), the block that is a child of it will move in conjunction, as demonstrated in the test in the level.
4. ⚖️ Event Comparison (Construction vs. BeginPlay)
When trying to move the logic to the Event BeginPlay, the platform unexpectedly moved to the world origin $(0, 0, 0)$ before starting its movement.
- Event BeginPlay: It executes when the level is already constructed. The Blueprint's relative position is already established in the world, causing the Interp To Movement node to move it to the global origin before going to the destination.
- Construction Script: It executes before the world is completely constructed or upon the component itself being constructed. This allows the movement to be initialized correctly from its relative origin position without going to the level's $(0, 0, 0)$.
- Conclusion: Although both can implement movement, the Construction Script in this case better handles the concept of the initial relative position for the Interp To Movement component.
This implementation offers a quick alternative to the moving platform, although with the limitation of the Delay at the end points.
Pad with Automatic Fall After a Time in Unreal Engine
We're going to explore the implementation of another platform, one that is visually simple but functionally crucial: a platform that disappears (falls) after a short period of time upon being stepped on.
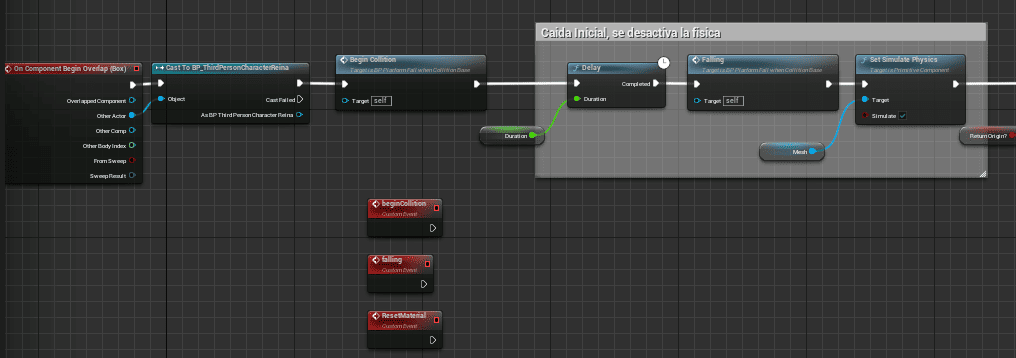
Part 2: Falling Platform with Reset
I present to you a very interesting Blueprint: a platform that falls on contact and, after a time, automatically returns to its initial position.
1. ⚙️ Behavior and Variables
This platform combines physical simulation (for the fall) with movement logic (for the return).
- Behavior: When stepping on the platform, a timer starts. When the time ends, the platform falls.
- Reset: After a one-second Delay, the platform moves back to its initial position and resets its state.
Exposed Variables:
- Duration (Float): The time that passes from when the player touches it until the platform begins to fall.
- Return to Origin (Boolean): If enabled, the platform will return to its original position after the fall.
- Return Duration (Float): The time it takes for the platform to return to its initial position.
Blueprint Logic
The key to this Blueprint is modularity, achieved through the use of Custom Events. These events allow for the creation of child Blueprints that inherit the logic but customize specific actions, such as material changes.
a. Preparation and Storage (Start Location)
At the beginning, the global position of the root component (Root) is saved in the Start Location variable. This position is vital for the platform to be able to return to its spot, regardless of where it has fallen.
b. Collision and Fall Start (Begin Overlap)
- Collision: The event is activated when stepping on the platform.
- Collision Event (Custom Event): A custom event is called (e.g., Collision Event). This event handles the visual logic (e.g., changing the material color to indicate the platform is about to fall).
- Timer (Delay): The Delay based on the Duration variable is introduced.
- Falling Event (Custom Event): This custom event is executed when the time ends. Inside this event, the Mesh's Set Simulate Physics node is called and set to True, which causes the platform to fall due to gravity.
c. Return to Origin
- This logic is executed if the Return to Origin variable is enabled:
- Fall Pause: A Delay is used (e.g., 2 seconds) to wait for the platform to fall completely and stop.
- Reset Physics: Set Simulate Physics is called and set to False to stop the fall simulation.
- Return Movement: We use the Move Component To node to move the Mesh back to the saved Start Location. The movement time is determined by Return Duration.
- Reset Material: Another custom event is called (e.g., Reset Material) so that the platform returns to its base color or material, indicating it is ready to be used again.
With this system, the fall and reset behavior, which is classic in many platform games, is achieved.
Slippery Surface in Unreal Engine 5
I'm going to present a very interesting Blueprint: the implementation of a slippery surface. This platform modifies the player's movement behavior while they are in contact with it, achieving the sliding effect.
1. ️ Visual Configuration and Collision
The platform uses a standard Blueprint structure with collision:
Mesh: Although it was initially a cube, I am now using a purchased asset to give it a better look. Visually, there's no mystery.
Collision: I use a Box Collision (which must be parallel to or contained within the Mesh) to detect character contact.
2. Movement Modification Logic
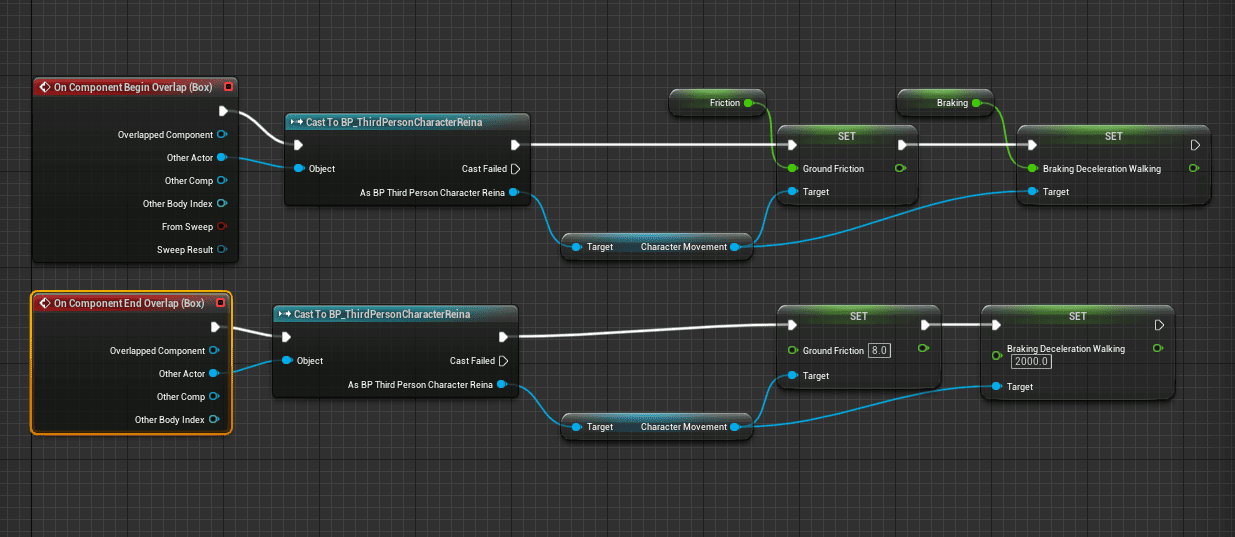
The key is to manipulate the properties of the player's Character Movement component upon entering and exiting the collision.
a. Collision Start Event (On Component Begin Overlap)
When the character comes into contact with the platform:
- Detection and Casting: The Box Collision is used to detect the Other Actor. Casting is performed to confirm that the actor is the player (Character).
- Movement Access: We get a reference to the player's Character Movement component.
- Property Modification (Slippery Effect):
- Ground Friction: The friction is set to zero (0). The default value in Unreal is usually 8. By removing friction, the character slides.
- Braking Deceleration Walking: This value is reduced to, for example, 350 (the default value is usually 2000). Reducing the deceleration makes the character take longer to stop after the player releases the movement key, emphasizing the slippery effect.
b. Collision End Event (On Component End Overlap)
This event is essential so that the change is not permanent. When the character leaves the platform:
- Reset: The same properties (Ground Friction and Braking Deceleration Walking) of the Character Movement component are obtained.
- Default Values: Their default values are assigned to them (8 for Ground Friction and $2000$ for Braking Deceleration Walking).
Importance of Resetting: If we don't reset these values upon exit, the character would maintain the sliding behavior in the rest of the level.
With this logic, we have created a surface that manipulates the player's movement properties to achieve the desired slippery effect.
Platform Rotation with Rotation Movement
I will show you the implementation of a platform that rotates on its own axis. The expected effect is that the player rotates along with the platform when positioned on it.
1. ️ Components and Configuration
The Blueprint for this platform is one of the simplest, as it uses a native Unreal Engine component.
- Mesh: Although you can use any shape (like a cube), I have replaced the mesh with a purchased asset to improve the appearance.
- Key Component: The central element is the Rotation Movement component. You must add it to the Blueprint to be able to apply the rotation movement.
Customization Variable
I only exposed one variable to control the movement:
- Rotation Factor (Float): This value does not indicate the degree of rotation (e.g., 90 degrees), but rather represents the rotation speed.
2. Movement Logic (Event Graph)
The rotation is applied at the start of the game and is based on the Rotation Factor variable.
- Reference: We get a reference to the Rotation Movement component.
- Set Speed: We use the Set Rotation Rate node (which is taken from the Rotation Movement component reference).
- Application of the Factor:
- We connect the Rotation Factor variable directly to the Z-axis of the Set Rotation Rate node.
- Z-axis: The movement is applied to the Z-axis so that the platform rotates horizontally (on its vertical axis). You can experiment with the other axes (X or Y) for rotations in different planes.
Example: If the factor is 10, the platform rotates slowly. If you double it to 20, it will rotate twice as fast, increasing the difficulty for the player.
With this implementation, you have a dynamic rotating platform that you can easily adjust for your levels.
Inheritance in Blueprint Classes or Child Blueprints, Moving BPs Together in Unreal Engine 5 Runtime
1. Failed Inheritance (Movement Applied to Mesh)
This is an extension of the previous explanation about the difference between applying movement to the Platform Mesh (the visible object) or to the Default Scene Root (the Blueprint root). The goal here is to demonstrate how the parent-child structure affects movement inheritance.
Previously, we determined that moving the Platform Mesh was the solution for the platform to move from point A to point B relatively, without going to the world origin (0, 0, 0).
The Child Component Problem
- Hierarchy: If we try to make a cube (an independent Blueprint) move with the platform, the first thing we would do is make it a child of the platform in the Outliner.
- Unexpected Result: When executed, the cube doesn't move with the platform.
- Cause: The movement is being applied to the Platform Mesh component (the child of the Root), but we have attached the cube as a child of the Default Scene Root (the root). The Root is not moving, only its child (the Mesh), so the cube stays put.
- Important: Movement and position inheritance only works if the child object is nested under the component that is actually being moved.
2. Successful Inheritance with New Component
To demonstrate correct inheritance, I changed the platform's movement implementation.
Automatic Movement Component
Instead of using the Move Component To node in the Event Graph, we will use a native Unreal component:
- Interp To Move: Similar to how the Rotation Movement component automates rotation (as shown in another video), the Interp To Move automates movement between points.
The Hierarchy Solution
By changing the implementation and using the Interp To Move component, we observe the key to the hierarchy:
- Structure: The Interp To Move component is at the same level as the Default Scene Root.
- Parent Movement: If we attach the cube as a direct child of the Default Scene Root (which is now the component being moved by the Interp To Move through its tree), both objects move.
Conclusion: The key for child component movement is to identify which parent component is receiving the position updates, and then make the new object its direct child.