Integrating Stripe with Laravel Cashier may seem complex at first, but in reality, it's one of the safest and most flexible ways to manage payments and subscriptions in your Laravel projects.
Stripe allows us to make payments on different platforms, and for our case of interest, which is developing applications with Laravel, we can integrate it directly into our application. This way, customers can make payments and purchase products within our platform.
In this article, I explain how to do it step by step, just as I implemented it in my own environment (Laravel with Vue 3).
Furthermore, I'll tell you about some errors I encountered in production and how I solved them so you don't have to go through the same thing. 😉
Laravel Cashier is the official way we have to integrate Stripe with Laravel—it's that simple, allowing for easy use of Stripe; moreover, we'll see how to use Vue Stripe along with Laravel.
Create a Stripe Account
The first thing you should do is create a Stripe account:
🔗 https://stripe.com/es
If you already have an account, you can log in directly; if not, follow the registration steps that Stripe indicates. Once created, you will have access to the dashboard:
Stripe Dashboard
In the dashboard, you will find everything we need for the course:
- Test and production mode: You can switch between them.
- Publishable and secret keys: Necessary for integrating Stripe into your project.
- Payment options: Apple Pay, Google Pay, PayPal, and more.
- Product catalog: Here you can create the products you will sell in your application.
It is important to keep the keys in test mode while developing and replace them with the production ones when we launch the application.
What Stripe Offers
Stripe works similarly to PayPal but offers more options:
- One-time payments
- Recurring payments
- Subscriptions
- Product and price management
To configure the products:
- Go to Product Catalog in your dashboard.
- Create the products you are going to sell (for example, “Shoes” or “Laravel Book”).
- Define the prices for each product.
You can create products by category, brand, or any criterion you need.
Stripe and Laravel
Laravel offers an official integration with Stripe through the Laravel Cashier package:
🔗 Laravel Cashier
With Cashier we can:
- Create customers and products
- Manage one-time payments and subscriptions
- Generate invoices
- Handle recurring payments
Additionally, Stripe also offers its native API which can be used in any PHP project:
🔗 Stripe API
You can choose between using the official Stripe API or Laravel Cashier, depending on your needs. For example, for a simple payment, the official API may suffice; for recurring payments or subscriptions, Cashier makes the job much easier.
Installation and Configuration of Laravel Cashier
To install and configure Cashier in Laravel, you must publish the migrations and the configuration file:
$ php artisan vendor:publish --tag="cashier-migrations" $ php artisan vendor:publish --tag="cashier-config"Once this is done, you can manage customers, subscriptions, and payments directly from your Laravel application.
Alternative with Vue
If your project uses Laravel with Inertia or Vue, you can also integrate Stripe using a Vue plugin called Vue Stripe:
🔗 https://vuestripe.com/
This plugin is very useful when you only want to sell products quickly and manage payments simply.
Summary
In summary, Stripe is a very versatile electronic wallet that we can use:
- Directly with its native API
- Through Laravel Cashier
- With Vue plugins for front-end applications
🚀 What is Laravel Cashier and why use it with Stripe?
Laravel Cashier is an official package that simplifies all the handling of recurring payments and subscriptions with Stripe (and Paddle). Instead of writing custom logic, Cashier offers you ready-made methods for creating, canceling, or verifying subscriptions.
In my case, I tried integrating Stripe "bare-bones" and then with Cashier, and the difference is huge. Cashier avoids you having to deal with tokens, IDs, and webhooks directly; everything comes down to methods like newSubscription() or subscribed().
💡 Advantages of using Cashier
- Quick implementation without writing payment logic from scratch.
- Automatic handling of subscriptions, cancellations, and grace periods.
- Native compatibility with Laravel.
- Simple integration with Stripe Checkout.
However, if your app is small and you only want to charge for a specific product once, using Cashier might be overkill. In those cases, direct Stripe Checkout may be sufficient.
Create Product ID and Price ID
Before moving on, you have to come here to the first page I showed you when I pointed you to the beginning of this section a couple of videos ago, where I indicated that when you authenticate you land on this page which is the dashboard.stripe.com:
So we're here, I'm going to come here to the home page, here you have to come and select "test mode" which would be the environments for performing tests, don't pay attention to this, it's something asking for additional information for my account, here you can also enable test mode.
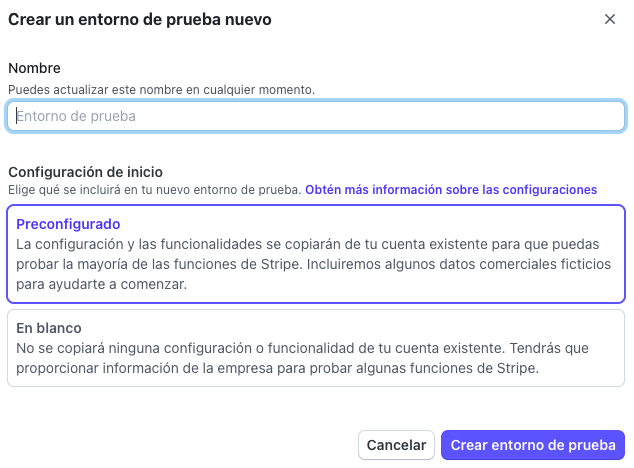
Create Test Environment
As a first step, we must go to the following link:
Click on the upper right corner:
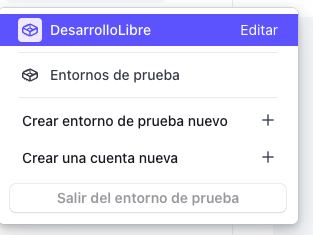
And create the test environment:
Create test products
Unlike PayPal, we must create the products we are going to sell so we can reference them through our Laravel/Vue application using an identifier, as we will see later; for this, from the following link:
https://dashboard.stripe.com/test/products?active=true
We create at least one product from the "Create a product" button:
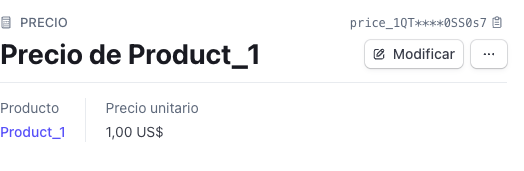
From the product details, in the configured price, by clicking on it, you will have the price identifier, which we will use later to be able to make a purchase of this product with the selected price:
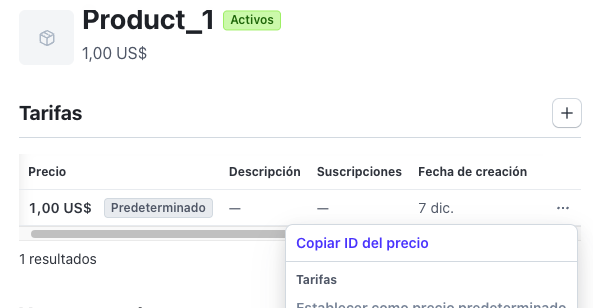
From the + button in the previous image, you can create more rates/prices since a product can have 1 to n prices which are the ones we use in our application to configure payments; payments must be of the one-time type, NOT recurring ones, recurring payments are for subscriptions.
Stripe handles a slightly different structure to what we are used to, for example with PayPal, where we simply set a price and that's it, here we cannot set the price or amount that we want, we have to establish a reference, a payment or a price, better said, that will be referenced here in our API, so to create that price, we first have to create a product.
https://dashboard.stripe.com/test/products
Create Product
We create at least one product from the "Create a product" button:
Recurring vs One-time Payment
Here to indicate billing periods 6 months 3 months annual weekly daily or custom, that is for the subscription part, you could say to make our lives easier, let's put "one-time" here which means it is a single payment and here you enter the amount, I'm going to enter one which is referring to one euro or one dollar, you switch it here to one-time and there you set it.
Create Price
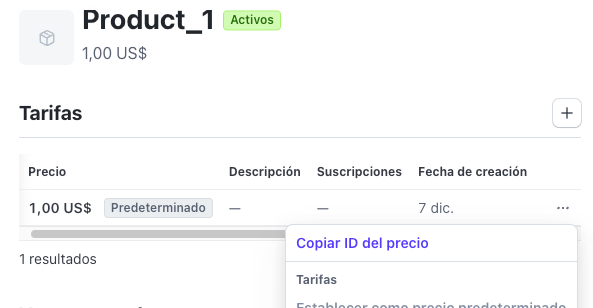
And that would be it, we click here to add product and there we have our product, now we have to select the product, let's see, this part is always a little complicated with this interface, I think it also appears here where it says prices and or rates, this would be to see the price, I think this is the one for the price, in the same way, click back here on the three dots, there's the product, yes, this would already be for the prices, look here we have copy the Price ID, since when we create a product.
⚙️ Laravel Cashier Installation and Stripe Configuration
The command composer require laravel/cashier, nothing strange, well, you put it here in your project and let it install happily:
$ composer require laravel/cashierAnd we publish its configuration and migrations:
$ php artisan vendor:publish --tag="cashier-config"
$ php artisan vendor:publish --tag="cashier-migrations"
$ php artisan migrate
This creates three main tables (customers, subscriptions, subscription_items) and the config file config/cashier.php.
🧩 Configure Stripe keys
In your .env file, add the following variables:
STRIPE_KEY=your-public-key
STRIPE_SECRET=your-secret-key
STRIPE_WEBHOOK_SECRET=your-webhook-secret
“Missing API key provided.”
It turned out that I hadn't correctly published the cashier.php file in config.
So make sure you run php artisan vendor:publish --tag="cashier-config" before deploying.
💸 Implement one-time payments with Stripe Checkout
Stripe Checkout allows you to redirect the user to a secure payment page, without storing sensitive data.
In your Laravel controller:
use Laravel\Cashier\Checkout;
use Illuminate\Http\Request;
function createSession(string $priceId)
{
   $session = Checkout::guest()->create($priceId, [
       'mode' => 'payment',
       'success_url' => url('/success').'?session_id={CHECKOUT_SESSION_ID}',
       'cancel_url' => url('/cancel'),
   ]);
   return $session->id;
}
This method creates a Checkout Session and returns its ID, which you can use from the frontend with sessionId; if you return the object:
return $sessionLaravel automatically performs the redirection to the Stripe website to make the payment.
💬 I prefer this approach because it redirects the user to Stripe (like PayPal does).
This way you avoid handling cards within your app and build more trust.
🔁 Recurring Subscriptions with Laravel Cashier
To enable subscriptions:
Create a recurring Price ID from the Stripe dashboard.
Use the newSubscription() method in your backend:
Route::post('/user/subscribe', function (Request $request) {
   $request->user()->newSubscription('default', 'price_monthly')
       ->create($request->paymentMethodId);
});
We indicate what the plan and price would be, and for the rest, we create it here using some payment method.
From here we have a lot of additional information. For example, we can set trial subscriptions, defining the days the trial will last.
This section also includes options related to billing, although I won't really cover that part in this course.
Coupons and discounts
Regarding coupons and discounts, I usually manage them directly from the application, but you can also create or manage them from Stripe.
In my case, if I need to apply a discount, I do it before setting it in Stripe, based on some internal condition.
So there you have the part about coupons, and also an option to configure the trial, although I don't remember exactly where it is located within the panel.
Subscription verification
Another interesting aspect is the possibility of verifying if a user is already subscribed, which is very useful for controlling access or avoiding duplicating plans.
In summary, with this we already have practically everything configured to manage plans, prices, coupons and trial periods in Stripe.
To verify if a user is subscribed:
if ($user->subscribed('default')) { // Access allowed }Create a recurring type Price in the Stripe dashboard
Remember that you must establish a recurring payment and not a one-time payment.
You can do it directly from the Stripe panel:
👉 https://dashboard.stripe.com/dashboard
Once the price is created, copy the generated Price ID.
Example of subscription in Laravel
Here is an example of how to create a new subscription from your Laravel application using the obtained Price ID:
Route::get('/stripe/new-subscription', function () {
    $user = User::find(1);
    dd(
        $user->newSubscription(
            'default',
            'YOUR_RECURRENT_PRICE_ID'
        )->create('<USER_PAYMENT_METHOD_ID>')
    );
});
💡 The tag 'default' can be replaced by any other name, as it simply works as an internal label used by the system.
Other important methods
Stripe handles what is known as a grace period, meaning that if the user has already paid for the subscription, they can continue to enjoy the service until the paid time ends.
You can verify if the user is still within this period with the following method:
$user->subscription('default')->onGracePeriod();Even if the subscription was canceled, the user will still have access during the remaining days they already paid for.
Verify if the subscription is active
To check if the user's subscription is still active or recurring, use the following method:
$user->subscription('default')->recurring();💻 Vue Stripe 4 Integration in Laravel - Legacy
If you use Vue 3 on the frontend, you can integrate Vue Stripe to manage payments and subscriptions from components.
This implementation I'm showing you uses version 4:
$ npm install @vue-stripe/vue-stripe@^4.5.0In the next section, I'll show you ANOTHER implementation that you can use in Vue or JavaScript and that DOES NOT require this package for one-time payments.
$ npm install @vue-stripe/vue-stripeThen, create a simple component:
<template>
 <div>
   <stripe-checkout
     ref="checkoutRef"
     mode="payment"
     :pk="publishableKey"
     :line-items="lineItems"
     :success-url="successURL"
     :cancel-url="cancelURL"
     @loading="v => loading = v"
   />
   <button :disabled="loading" @click="submit">Pay now!</button>
 </div>
</template>
<script>
import { StripeCheckout } from '@vue-stripe/vue-stripe';
export default {
 components: { StripeCheckout },
 data() {
   this.publishableKey = 'pk_test_...';
   return {
     loading: false,
     lineItems: [{ price: 'price_1234', quantity: 1 }],
     successURL: 'http://tuapp.test/success',
     cancelURL: 'http://tuapp.test/cancel',
   };
 },
 methods: {
   submit() {
     this.$refs.checkoutRef.redirectToCheckout();
   },
 },
};
</script>
Parameters you can configure:
- pk (string - required): Stripe publishable key.
- sessionId (string - Not required): The ID of the payment session that is used in the client-server integration.
- lineItems (array[object] - Not required): An array of objects representing the items the customer wishes to purchase, we must include the priceId(s) configured for the product(s) we created in the Stripe dashboard.
- mode (string - Not required): The mode of the payment session, either payment or subscription.
- successUrl (string - Not required): The URL Stripe should send customers to when the payment is complete.
- cancelUrl (string - Not required): The URL Stripe should send customers to when the payment is cancelled.
Here the success and cancel components, the component really doesn't matter to me, obviously I would have to create one for Stripe but it doesn't matter much to us right now, so here we have it:
router.js
import { createRouter, createWebHistory } from "vue-router";
import { useCookies } from 'vue3-cookies'
const { cookies } = useCookies()
import List from './componets/ListComponent.vue'
import OnePayment from "./componets/stripe/OnePayment.vue";
const routes = [
    ***
    {
        name: 'stripe',
        path: '/vue/stripe/one-payment',
        component: OnePayment
    },
    {
        name: 'success',
        path: '/vue/stripe/success',
        component: List
    },
    {
        name: 'cancel',
        path: '/vue/stripe/cancel',
        component: List
    },
]
const router = createRouter({
    history: createWebHistory(),
    routes: routes
})
export default router
⚙️ Tip:
- Only the public key is used from the client (Vue).
- The secret key must always be kept on the server.
Integration with Vue, Modern form
All the code presented above remains the same, except for the Vue OnePayment.vue component, which is now as follows:
resources/js/vue/componets/stripe/OnePayment.vue
<template>
  <div>
    <div v-if="publishableKey">
      <div v-if="checkoutUrl">
        <button @click="submit" :disabled="loading">Pay Now</button>
      </div>
      <p v-else>Cargando sesión...</p>
    </div>
    <div v-else>Cargando configuración de Stripe...</div>
  </div>
</template>

<script>
export default {
  data() {
    return {
      loading: false,
      publishableKey: window.Laravel.clientStripe,
      checkoutUrl: '',
       lineItems: [
        {
          price: 'price_1QTO20EHJX14M8EEKW0SS0s7', // recurrente
          quantity: 1
        },
      ]
    };
  },
  methods: {
    submit() {
      if (this.checkoutUrl) {
        window.location.href = this.checkoutUrl;
      }
    }
  },
  async mounted() {
    try {
      const res = await this.$axios.get('/api/stripe/create-session/' + this.lineItems[0].price);
      console.log("Respuesta de Stripe:", res.data);

      // El objeto Session devuelto por Stripe (vía Laravel) contiene una propiedad 'url'.
      // Redirigir directamente a esta URL es el método actual recomendado.
      if (res.data && res.data.url) {
        this.checkoutUrl = res.data.url;
      } else {
        console.error("No se pudo obtener la URL de Checkout del servidor. Estructura recibida:", res.data);
      }
    } catch (error) {
      console.error("Error obteniendo sesión:", error);
    }
  }
}
</script>
As you can see, the Vue Stripe plugin is NOT necessary; it can be done simply from the Checkout object.
app/Http/Controllers/Api/StripeController.php
class StripeController extends Controller
{
    function createSession(***)
    {

        ***
        return response()->json([
            'id' => $session->id,
            'url' => $session->url
        ]);
    }
}
We do the redirects manually.
Do not use priceID to process payments
Alternatively, we can supply the amount directly from the customer:
const res = await this.$axios.get(this.$api.stripeCreateSessionId, {
  params: {
    amount: this.basePrice,
  }
});
And on the server:
public function createSessionId()
{
    $successRouteUrl = request('successRouteUrl');
    $checkoutSessionId = '{CHECKOUT_SESSION_ID}';

    $separator = strpos($successRouteUrl, '?') === false ? '?' : '&';
    $url = "{$successRouteUrl}{$separator}session_id={$checkoutSessionId}";

    if (request()->has('amount')) {
        $sessionId = $this->createSessionByAmount(request('amount'), $url);
    } else {
        $sessionId = $this->createSessionByPriceId(request('price_id'), $url);
    }

    return $this->successResponse($sessionId);
}
public function createSessionByPriceId(string $priceId, string $successRouteUrl, string $cancelUrl = "https://academy.desarrollolibre.net/")
{
    $session = Checkout::guest()->create(
        $priceId,
        [
            'mode' => 'payment',
            'success_url' => $successRouteUrl,
            'cancel_url' => $cancelUrl,
        ],
    );

    return response()->json([
        'id' => $session->id,
        'url' => $session->url
    ]);
}

public function createSessionByAmount(float $amount, string $successRouteUrl, string $cancelUrl = "https://academy.desarrollolibre.net/")
{
    $session = Cashier::stripe()->checkout->sessions->create([
        'success_url' => $successRouteUrl,
        'cancel_url' => $cancelUrl,
        'line_items' => [
            [
                'price_data' => [
                    'currency' => 'usd',
                    'product_data' => [
                        'name' => 'Compra en Desarrollolibre Academy',
                    ],
                    'unit_amount' => $amount * 100, // Stripe uses cents
                ],
                'quantity' => 1,
            ],
        ],
        'mode' => 'payment',
    ]);

    return $session->id;
}
Client-Only Integration, Risks and Limitations in Using Vue Stripe
If we check the developer console, we'll see a message like the following:
v3:1 Uncaught (in promise) IntegrationError: The Checkout client-only integration is not enabled. Enable it in the Dashboard at https://dashboard.stripe.com/account/checkout/settings. at Sl (v3:1:461068) at e._handleMessage (v3:1:469393) at e._handleMessage (v3:1:85275)🛡️ Public and Secret Keys: Security in Transactions
In these types of services, a private key or secret key must always exist. Practically all payment services work this way. The secret key is usually used on the server side to ensure that the operation is being processed correctly and securely.
It's a process similar to what we did with PayPal: on the client, we set up the plugin with the public key, but on the server, once the order was created, we approved that order using the secret key. This adds an extra layer of security.
The public key and secret key function analogously to a username and password (where the public key is the username and the private key is the password). In the current Stripe configuration, we are only working with the public key, which makes the operation much more insecure.
⚠️ Security Risks When Using Only the Public Key
It is a significant risk: an attacker could intercept the request and change your public key for theirs. If this public key were persistent, for example, in a database, and they intercede and inject theirs, all payments would fall into their account. Hence the importance of the secret key.
For this reason, the "Enable client-only integration" option is obfuscated by default, as it is a less secure operation than the traditional method.
Once we allow this integration (by clicking), the process should work correctly:
🛑 The Main Problem: Product Assignment Logic
The key problem with the current configuration is the lack of application logic after payment.
If we are selling something (a course, tickets, a book, etc.), it is assumed that when the user makes the payment, we assign that record or product to them. With the current client-only configuration, it is not possible to perform these types of operations.
Therefore, this implementation is nothing more than a simple "quick access" for people to pay us to an account configured only with the public key.
Summary of Limitations
In summary, the limitations of the current configuration are two:
- Insecurity: It is more insecure because only the public key is used to match the account. This, depending on the integration, can make it more susceptible to hacking and the diversion of funds to another account.
- Inability to Assign Products: It is not possible, at least with this configuration, to implement the necessary logic so that, once the payment is made, our application can release or assign the products the user has just purchased.
- We will solve this in the following videos, but it is important that you understand these limitations beforehand.
Next step, learn how to get started with Boost with this tutorial on how to use the Laravel SDK.