
Content Index
- 1. What localization in Laravel is and why it matters
- 2. Initial configuration of localization in Laravel
- 3. Creation of language files (PHP and JSON) and text strings for translation
- 4. Displaying translations in views and controllers
- 5. How to change the language dynamically in your app
- 6. Advanced localization and best practices
- Middleware to verify the es/en language prefix in Laravel
- Translations in Laravel with Inertia.js
- The manual solution
- The elegant solution: bilateral integration with a package
- Installation on the backend (PHP)
- Configuration of language files (Lang)
- Logic in routes and controller
- The language controller
- Consuming translations in the Vue component
- Select language in Laravel with Livewire
- The component and locale management
- Transition and UI reload
- Middleware to maintain language between requests
- Language files in JSON format
- 7. Conclusion: experience and practical recommendations
- ❓ Frequently Asked Questions
Laravel includes native support for localization, which is the ability to adapt your application to the language and region from which it is consumed. This allows you to offer two key features: automatic detection of the user's language and translation of texts according to their preference. In this article, we will cover both scenarios, from basic configuration to its integration with Livewire and Inertia.js.
If you haven't seen how to handle Custom Exceptions in Laravel yet, I recommend taking a look at it before continuing.
Localization in Laravel is one of those features that, once you master, allows you to take your applications to another level. In my experience, it not only improves the usability of the product, but it also opens the door to new markets and international users. Throughout this guide, I will explain how to configure, create, and manage translations in Laravel, relying on real examples and best practices.
1. What localization in Laravel is and why it matters
Localization (L10n) is the process of adapting your application to different languages, currencies, or regional formats. Laravel integrates it natively, facilitating both the translation of texts and the automatic detection of the user's language. It is one of the most powerful features of the framework and, surprisingly, one of the most underrated.
In one of my first multi-language projects, I discovered that a minimal configuration was enough to offer the complete interface in English and Spanish. This capability is especially useful if your application has international users or if you plan to expand outside of your initial market.
Key difference between the two concepts that are often confused:
- Internationalization (i18n): preparing the app to handle multiple languages (structure, configuration, data flow).
- Localization (L10n): adapting specific texts and configurations to each concrete language or region.
2. Initial configuration of localization in Laravel
When creating a new Laravel project, you will notice that the /lang folder does not exist by default. In my first attempts, I thought it was an error, but in reality, Laravel expects you to generate it yourself with a simple Artisan command:
$ php artisan lang:publishThis command creates the /lang folder in the root of the project and publishes the base language files that Laravel uses internally (validations, pagination, passwords, etc.).
The lang:publish command will create the lang directory in your application and publish the default set of language files used by the framework itself:
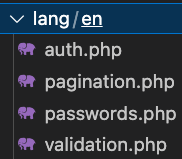
Inside config/app.php, you can define the default language by modifying the following key:
'locale' => 'es',If you work with multiple languages, it is also recommended to adjust the fallback_locale (fallback language):
'fallback_locale' => 'en',This way, if a translation in Spanish is missing, Laravel will automatically display the text in English instead of returning the raw key.
3. Creation of language files (PHP and JSON) and text strings for translation
Laravel provides two formats to manage translation strings, which are responsible for displaying texts in the correct language; in both cases, we must create a base folder to store them:
/lang
Inside that folder, we can create our translation files in PHP:
/lang
    /en
        messages.php
    /es
        messages.php
Or in JSON format:
/lang
    en.json
    es.json
In this guide, we will use the PHP format, as it is more scalable and allows modularizing messages by context (authentication, user messages, validations, etc.). You can create as many files as you need.
Each file returns an array of key/value pairs, where the key identifies the text and the value is the corresponding translation. For example:
lang/en/messages.php
<?php

return [
    'welcome' => 'Welcome to our application!',
];
lang/es/messages.php
<?php

return [
   'welcome' => 'Bienvenido a nuestra aplicación!',
];
4. Displaying translations in views and controllers
Once the strings are created, you can display them anywhere in your application using the helper function __() or the @lang directive in Blade:
echo __('messages.welcome')The format is file.key: first the file name (without extension) and then the key inside the array. The __() function returns the translated text corresponding to the active locale; if the key does not exist, it returns the key itself as fallback text. This scheme works both in controllers and Blade views.
Common mistakes you should avoid:
- Using an incorrect key (Laravel will return the literal key instead of the translation).
- Not having executed
php artisan lang:publishto generate the/langfolder. - Forgetting to clear the cache with
php artisan config:clearafter changing language or configuration files.
5. How to change the language dynamically in your app
To change the language during navigation, you can do it manually inside a controller or, more elegantly, through a localization middleware that intercepts every request.
Generate the middleware with Artisan:
$ php artisan make:middleware LocalizationAnd inside the handle method, you set the locale according to the parameter received in the request:
public function handle($request, Closure$next)
{
   $locale =$request->get('lang', config('app.locale'));
   app()->setLocale($locale);
   return $next($request);
}
Thus, if the user visits /home?lang=es, the application will automatically switch to Spanish.
In one of my projects, I added a language selector in the site header and saved the preference in the session to maintain the user's choice between visits:
session(['locale' => $locale]);
app()->setLocale(session('locale', 'es'));
6. Advanced localization and best practices
Once you master the basic configuration, you can move on to more complex scenarios:
- Dynamic content translation (from the database): using packages like Spatie Translatable, which stores translations directly in JSON columns.
- Translated routes: with packages like
mcamara/laravel-localization, you can have user-friendly URLs per language (e.g.,/es/blogvs./en/blog). - Multi-language SEO: implementing
<link rel="alternate" hreflang="...">tags to inform search engines about the page versions in each language.
In addition, Laravel allows pluralization and variable substitution in translation strings directly from the language files:
'notifications' => '{0} No tienes notificaciones|{1} Tienes una notificación|[2,*] Tienes :count notificaciones',With this structure, the framework automatically chooses the correct phrase based on the provided number. To use it, you call trans_choice('messages.notifications', $count) instead of the usual __() function.
Middleware to verify the es/en language prefix in Laravel
The next implementation consists of creating a middleware that detects the language configured in the URL (using a prefix like es or en) and sets the application locale accordingly, using the translation strings we defined earlier. Additionally, if the prefix is invalid, it will automatically redirect to the default language. To create it:
$ php artisan make:middleware LanguagePrefixMiddlewareWith the following content:
app\Http\Middleware\LanguagePrefixMiddleware.php
<?php

namespace App\Http\Middleware;

use Closure;
use Illuminate\Http\Request;
use Symfony\Component\HttpFoundation\Response;

class LanguagePrefixMiddleware
{
    /**
     * Handle an incoming request.
     *
     * @param  \Closure(\Illuminate\Http\Request): (\Symfony\Component\HttpFoundation\Response)  $next
     */
    public function handle(Request $request, Closure$next): Response
    {

        $language =$request->segment(1);

        if(!in_array($language,['es','en'])){
            return redirect('/es/blog');
        }

        app()->setLocale($language);

        return $next($request);
    }
}
The middleware is straightforward: it gets the first segment of the URL with $request->segment(1) and verifies if it is a valid locale (es or en). If it is not, it redirects to /es/blog as a fallback. Otherwise, it sets the locale with app()->setLocale($language) and continues with the request.
We register the middleware in the routes as follows:
Route::get('/{lang}/mi-ruta', 'MiControlador@miMetodo');In our application, we group the blog routes using a helper function and apply the middleware to both route groups (with and without locale prefix):
function routeBlog() {
    Route::get('', [BlogController::class, 'index'])->name('blog.index');
    Route::get('detail/{id}', [BlogController::class, 'show'])->name('blog.show');
}

Route::group(['prefix' => '{locale}/blog','middleware' => LanguagePrefixMiddleware::class], function () {
    routeBlog();
});

Route::group(['prefix' => 'blog','middleware' => LanguagePrefixMiddleware::class], function () {
    routeBlog();
});
We create the helper function routeBlog() to centralize the definition of blog routes and reuse it across both groups. This way, the blog is accessible with the explicit locale in the URL:
- es/blog/*
- en/blog/*
And when accessed without the locale prefix, the middleware intercepts the request and automatically redirects to Spanish:
- blog/* → redirects to /es/blog/*
Translations in Laravel with Inertia.js
We are going to see how to create a multi-language application just as we would in traditional Laravel development, but adapted to the Inertia.js context with Vue. It is worth noting that this same implementation works identically if your architecture uses React or Svelte instead of Vue.
In "pure" Laravel, accessing a translation is as simple as:
__('messages.welcome')Or also:
trans('messages.welcome')Remember that in Laravel's native scheme, we create translation files in /lang and access texts via the helper functions __() or trans(). The problem is that when working with Inertia.js, we are no longer in Blade files, but in .vue, .jsx, or .svelte components. By switching environments, we lose direct access to those server functions because they execute in PHP and are not available in JavaScript.
The manual solution
Previously, the common way to approach this was creating a custom middleware that read translation files on the backend and injected them globally into the client via Inertia::share().
While this approach works (it is very similar to what we do with flash messages in Inertia), the reality is that it is quite cumbersome. Manually passing massive translation collections from PHP to JavaScript can bloat page size and clutter business logic with responsibilities that do not belong to the middleware.
The elegant solution: bilateral integration with a package
To save us that manual work, we are going to use a specialized package that seamlessly bridges the world of Laravel with the frontend ecosystem (Vue/React/Svelte): erag/laravel-lang-sync-inertia.
The implementation requires two installations: one on the server (PHP) and another on the client (Node):
Installation on the backend (PHP)
We run the Composer command to install the package in our Laravel core:
$ composer require erag/laravel-lang-sync-inertiaWe generate the language folder:
$ php artisan lang:publishWe publish the package configuration file:
$ php artisan erag:install-langAnd we install the Node package, which is what we consume from the Vue components:
$ npm install @erag/lang-sync-inertiaConfiguration of language files (Lang)
The first step is to have our translation files ready on the backend. This is done in the traditional Laravel way: we create the lang/ folder in the project root (or inside resources/lang/ depending on your Laravel version) and generate subfolders for each language, such as es/ or en/, with their respective PHP files returning arrays.
Since we covered this procedure in detail earlier, I will take it for granted; remember it is the framework's standard for indexing text strings. As a complete example, this is how the files for this demo would look:
lang\es\messages.php
<?php

return [
    'title' => 'Demo de Localización',
    'welcome' => '¡Bienvenido a nuestra aplicación!',
    'description' => 'Esta es una demostración de localización con Laravel Inertia.',
    'greeting' => '¡Hola, :name!',
    'select_language' => 'Seleccionar Idioma',
    'current_language' => 'Idioma Actual',
    'switch_to' => 'Cambiar a',
    'content' => [
        'intro' => 'Bienvenido a la página de demostración de localización.',
        'features' => 'Características',
        'feature_1' => 'Fácil gestión de traducciones',
        'feature_2' => 'Sincronización automática con el frontend',
        'feature_3' => 'Soporte para múltiples idiomas',
        'footer' => '¡Gracias por visitarnos!',
    ],
    'buttons' => [
        'submit' => 'Enviar',
        'cancel' => 'Cancelar',
        'save' => 'Guardar',
        'back' => 'Volver',
    ],
];
lang\en\messages.php
<?php

return [
    'title' => 'Localization Demo',
    'welcome' => 'Welcome to our application!',
    'description' => 'This is a demonstration of Laravel Inertia localization.',
    'greeting' => 'Hello, :name!',
    'select_language' => 'Select Language',
    'current_language' => 'Current Language',
    'switch_to' => 'Switch to',
    'content' => [
        'intro' => 'Welcome to the localization demo page.',
        'features' => 'Features',
        'feature_1' => 'Easy translation management',
        'feature_2' => 'Automatic sync with frontend',
        'feature_3' => 'Support for multiple languages',
        'footer' => 'Thank you for visiting!',
    ],
    'buttons' => [
        'submit' => 'Submit',
        'cancel' => 'Cancel',
        'save' => 'Save',
        'back' => 'Go Back',
    ],
];
Logic in routes and controller
To handle dynamic language switching, I prepared two routes in routes/web.php: one responsible for rendering the main view (index) and another specifically designed to process the language change action (changeLanguage).
The language controller
Let's see how we handle the client request in the controller:
app\Http\Controllers\LocalizationController.php
<?php

namespace App\Http\Controllers;

use Inertia\Inertia;

class LocalizationController extends Controller
{
    public function index()
    {
        $locale = session('locale', 'en');
        app()->setLocale($locale);

        syncLangFiles('messages');

        return Inertia::render('localization/Index');
    }

    public function changeLanguage(string $locale)
    {
        $availableLocales = ['en', 'es'];

        if (! in_array($locale, $availableLocales)) {$locale = 'en';
        }

        session(['locale' => $locale]);
        app()->setLocale($locale);

        return to_route('localization.index');
    }
}
routes\web.php
// LOCALIZATION
Route::prefix('localization')->group(function () {
    Route::get('/', [LocalizationController::class, 'index'])->name('localization.index');
    Route::get('/lang/{locale}', [LocalizationController::class, 'changeLanguage']);
});
Consuming translations in the Vue component
Once the package is installed and injected into the Vue instance, using it inside components is extremely clean. We have access to the two classic syntaxes via the vueLang() composable, which exposes both __() and trans(); you can pick the one that best suits your style:
resources\js\pages\localization\Index.vue
<script setup>
import { ref } from 'vue';
import { router } from '@inertiajs/vue3';
import { vueLang } from '@erag/lang-sync-inertia';

const { trans, __ } = vueLang();

const currentLocale = ref('en');

const availableLocales = [
    { code: 'en', name: 'English', flag: '' },
    { code: 'es', name: 'Español', flag: '' },
];

function changeLocale(locale) {
    currentLocale.value = locale;
    router.visit(`/localization/lang/${locale}`, {
        preserveState: true,
    });
}
</script>

<template>
    <div class="min-h-screen p-8">
        <div class="mx-auto max-w-4xl">
            <div class="mb-8">
                <h1 class="mb-2 text-3xl font-bold text-gray-800">
                    {{ __('messages.title') }}
                </h1>
                <p class="text-gray-600">
                    {{ __('messages.description') }}
                </p>
            </div>

            <div class="mb-8 rounded-lg  p-6 shadow">
                <h2 class="mb-4 text-lg font-semibold">
                    {{ __('messages.current_language') }}
                </h2>
                <div class="flex gap-2">
                    <button
                        v-for="locale in availableLocales"
                        :key="locale.code"
                        @click="changeLocale(locale.code)"
                        class="rounded px-4 py-2 transition-colors"
                        :class="
                            currentLocale === locale.code
                                ? 'bg-blue-500 text-white'
                                : 'bg-gray-200 text-gray-700 hover:bg-gray-300'
                        "
                    >
                        {{ locale.flag }} {{ locale.name }}
                    </button>
                </div>
            </div>

            <div class="rounded-lg bg-white p-6 shadow">
                <h2 class="mb-4 text-xl font-bold text-gray-800">
                    {{ trans('messages.welcome') }}
                </h2>

                <p class="mb-4 text-gray-600">
                    {{ __('messages.content.intro') }}
                </p>

                <div class="mb-6">
                    <h3 class="mb-3 text-lg font-semibold text-gray-700">
                        {{ __('messages.content.features') }}
                    </h3>
                    <ul class="space-y-2">
                        <li class="flex items-center gap-2">
                            <span class="text-green-500">✓</span>
                            {{ __('messages.content.feature_1') }}
                        </li>
                        <li class="flex items-center gap-2">
                            <span class="text-green-500">✓</span>
                            {{ __('messages.content.feature_2') }}
                        </li>
                        <li class="flex items-center gap-2">
                            <span class="text-green-500">✓</span>
                            {{ __('messages.content.feature_3') }}
                        </li>
                    </ul>
                </div>

                <div class="mb-6">
                    <h3 class="mb-3 text-lg font-semibold text-gray-700">
                        {{ trans('messages.greeting', { name: 'Developer' }) }}
                    </h3>
                </div>

                <div class="flex gap-4">
                    <button
                        class="rounded bg-blue-500 px-4 py-2 text-white hover:bg-blue-600"
                    >
                        {{ __('messages.buttons.submit') }}
                    </button>
                    <button
                        class="rounded bg-gray-200 px-4 py-2 text-gray-700 hover:bg-gray-300"
                    >
                        {{ __('messages.buttons.cancel') }}
                    </button>
                    <button
                        class="rounded bg-green-500 px-4 py-2 text-white hover:bg-green-600"
                    >
                        {{ __('messages.buttons.save') }}
                    </button>
                </div>

                <div class="mt-8 border-t pt-4">
                    <p class="text-gray-500">
                        {{ __('messages.content.footer') }}
                    </p>
                </div>
            </div>

            <div class="mt-8 rounded-lg bg-blue-50 p-6">
                <h3 class="mb-2 font-semibold text-blue-800">How it works</h3>
                <p class="text-sm text-blue-700">
                    This page uses the <code>__()</code> and
                    <code>trans()</code> functions from
                    <code>@erag/lang-sync-inertia</code> to display translations
                    synced from Laravel's language files.
                </p>
                <ul class="mt-2 text-sm text-blue-700">
                    <li>
                        <code>__('messages.title')</code> - Simple translation
                    </li>
                    <li>
                        <code
                            >trans('messages.greeting', {'{'} name: 'Developer'
                            {'}'})
The most important part of the previous implementation is the syncLangFiles function, which is responsible for synchronizing PHP translation files to the frontend on each request:
syncLangFiles('messages');You can synchronize multiple files at once by passing an array:
syncLangFiles(['messages', 'auth']);And if you need to generate the translation JSON for the frontend (useful in production builds):
$ php artisan erag:generate-langSelect language in Laravel with Livewire
I will show you how you can handle language switching directly in Laravel using Livewire. In the video, you can see that the interface changes to Spanish and back to English in real time, without manually reloading the page.
The implementation is simple: we will use Livewire to manage the user's language preference. If for any reason you prefer not to use Livewire, with basic knowledge of Laravel you can adapt this logic to any other approach. What is truly important is understanding which functions to call and at what moment, regardless of how you implement it.
The component and locale management
This is the Livewire component. Every time the user changes the language using wire:model.live, Livewire automatically invokes the render() method, where we manage the locale change:
<?php

namespace App\Livewire\User;

use Livewire\Attributes\Layout;
use Livewire\Component;

use Illuminate\Support\Facades\App;

#[Layout('layouts.store')]
class UserProfile extends Component
{

    public $language;

    public function render()
    {
        if (!isset($this->language)) {
            // Al cargar el componente por primera vez, tomamos el locale de la sesión
            // o el que tenga configurado la aplicación en ese momento.
            $this->language = session('locale') ?? App::getLocale();
        } else {
            // Al cambiar el selector (wire:model.live), guardamos en sesión y aplicamos el locale.
            session(['locale' => $this->language]);
            App::setLocale($this->language);
        }

        return view('livewire.user.user-profile');
    }
}
There are many ways to implement this; this was the one that worked best for me in practice. The important thing is that the locale reaches the component correctly. The flow is as follows:
- If
$languageis not defined, we initialize the locale with the value stored in the session (usingsession('locale')) or, if there is nothing in session, with the current application locale usingApp::getLocale(). - When the user changes the selector,
wire:model.livetriggers a re-render and enters theelseblock, where we save the preference in session withsession(['locale' => $this->language]). - It is critical to call
App::setLocale($this->language)to apply the change at the framework level within that same request; without this, translations will not update.
You can also take this opportunity to persist the user's preference in the database. In another article, I discussed how to store preferences without having to create 20 columns: the key is to store a small JSON object in a single column. It is exactly the pattern we can apply here.
Transition and UI reload
In Livewire, to make the language change reflect across the entire interface (not just within the component), I added a small snippet of Alpine.js that waits a few milliseconds for the wire:model request to complete and then reloads the full page:
<flux:select :label="__('Language')" id="language" wire:model.live="language" x-data @change="setTimeout(function(){window.location.reload()}, 100)" class="mt-1 block w-full rounded border-gray-300">
    <option value="es">Español</option>
    <option value="en">English</option>
</flux:select>
Middleware to maintain language between requests
It is fundamental that the selected language is maintained across all subsequent requests. Without middleware, navigating to another section of the app (for example, to the blog) would reset the locale to the default value configured in config/app.php.
To solve this, we implement a middleware that reads the locale stored in the session and applies it on every incoming request:
$ php artisan make:middleware SetLocaleInside that middleware, we set the locale from the session only if a stored value exists. You can also use the second parameter of session() to define the default language directly, but in my case, I preferred using the explicit conditional:
<?php

namespace App\Http\Middleware;

use Closure;
use Illuminate\Support\Facades\App;

class SetLocale
{
    public function handle($request, Closure $next)
    {

        if (session('locale')) {
            App::setLocale(session('locale'));
        }

        return $next($request);
    }
}
Where to register the middleware?
You can apply it directly to specific route groups:
Route::middleware([SetLocale::class])But the cleanest way from Laravel 11 onwards is to register it in the web group inside bootstrap/app.php, so that it runs automatically on every HTTP request:
bootstrap/app.php
->withMiddleware(function (Middleware $middleware) {
    $middleware->web([
        // Your custom middleware
            \App\Http\Middleware\SetLocale::class,
    ]);
})
Remember that middleware executes before the controller processes the request, making it the ideal place to establish global settings like the locale.
Language files in JSON format
Create your translation files for es and en in JSON format. The advantage of this format is that you can use the literal string as the key, which is very convenient for short, reusable texts across views:
resources/lang/es.json
{
    "Light": "Claro",
    "Dark": "Oscuro",
     ***
}
resources/lang/en.json
{
    "Light": "Light",
    "Dark": "Dark",
     ***
}
Then, from Blade views, reference the text using __() with the field name as the key:
For example:
{{ __('Light') }}In this straightforward way, we have configured the language system in Laravel with Livewire. It all comes down to two key steps: saving the user's preference (in session or database) and applying the locale on every request through middleware.
7. Conclusion: experience and practical recommendations
Localization is one of those features that makes the difference between a functional app and an app prepared to scale globally.
In my experience, the most important thing is to maintain a clear structure in the language files, use consistent key names, and document new translations as a team to avoid duplication.
If you work in a team, an additional tip is to use tools like Phrase or Linguise to synchronize translations between developers and prevent inconsistencies.
And remember: although Laravel does much of the heavy lifting for you, the quality of localization depends on how organized you keep your texts and workflow. A well-structured translation system from the start will save you many headaches as the app grows.
❓ Frequently Asked Questions
- What is the difference between JSON and PHP translations in Laravel?
- PHP files allow grouping texts by module using nested arrays, making them more scalable in large projects. JSON files, on the other hand, use the literal string as the key, which is more convenient for simple and reusable texts across views.
- How do I automatically detect the user's language?
- You can use
$request->getPreferredLanguage()to read the browser'sAccept-Languageheader, or create middleware that detects the language from the URL prefix, as seen in this guide.
- You can use
- Can I translate dynamic content stored in the database?
- Yes, using the Spatie Translatable package, you can store multi-language versions directly inside JSON columns in your database, without needing extra tables.
- How do I change the language without reloading the entire page?
- With Livewire, you can use
wire:model.liveto update the locale on the server without reloading the page. If you need the change to affect the entire interface, combine it with a small Alpine.js script that refreshes the page after the request, as shown in this guide.
- With Livewire, you can use
The next step is to learn the system of Authorization in Laravel with Gates and Policies.