
Content Index
- 1. What is Artisan in Laravel and why is it so useful
- Difference between php artisan and sail artisan
- 2. How to use Artisan from scratch
- 3. Most used Artisan commands in Laravel
- 4. Creating your own custom Artisan commands
- Best practices when creating custom commands
- Useful Artisan commands
- Creating the class for our custom command
- Generating the logic of our command
- Optional parameters in commands
- Named parameters (options)
- 5. Artisan commands to optimize your Laravel application
- 6. Project routes with Artisan
- View only your application routes (excluding third-party ones)
- 7. Common errors and how to solve them with Artisan
- 8. Summary of essential Artisan commands
- Frequently asked questions about Artisan in Laravel
Laravel features a simple and very powerful command-line interface (CLI) known as Artisan. In simple terms, Artisan is nothing more than a file named artisan located at the root of your project, which serves as an entry point to execute a series of predefined commands provided by the framework itself. Of course, you can also extend those commands by programming your own, but we will see that later. For now, and since we already know routes in Laravel, let's look at Artisan. Overall, the commands it offers can be divided into three main groups:
Commands to generate files:
- Create migrations: files that store the structure of a table that the framework maps to the database (we will see them in detail in another chapter).
- Generate seeds to populate the database with test data.
- Generate controllers, models, middlewares, and other types of framework files.
Commands to manage processes:
- Start an integrated development server, useful if you do not want to configure Apache or other external servers.
- Run or rollback migrations.
- Clear configuration, route, and view caches.
- Manage the database (seeders, migrations, rollbacks).
- Run migrations and seeds combined.
Commands to get project information:
- List all available commands.
- List the routes registered in the project.
If you are starting with Laravel or want to make the most of this tool, here I explain how to use Artisan step by step, with practical examples and real development tips.
1. What is Artisan in Laravel and why is it so useful
The artisan file lives at the root of the project and acts as the entry point to Laravel's command system. To run it, you always use the structure php artisan command:name, for example:
$ php artisan make:controller UserControllerWith that single line, you automatically generate a complete controller with its base structure. That simplicity was, personally, one of the things that made me fall in love with Laravel: what in other frameworks requires multiple steps is solved here in seconds.
Difference between php artisan and sail artisan
If you are using Laravel Sail (Laravel's official Docker environment) and do not have PHP installed directly on your system, you will need to run Artisan commands like this:
./vendor/bin/sail artisan make:controller UserControllerThe difference is simple: php artisan uses your local machine's PHP, while sail artisan runs inside the Docker container. The result is the same; only the execution environment changes.
2. How to use Artisan from scratch
Getting started with Artisan is very simple. The first command you should try when opening any Laravel project is:
$ php artisan listThis will show you all available commands, sorted by categories. It is the best way to explore what the framework (and installed packages) offers without having to search the documentation.
General structure of an Artisan command
The basic structure is always the same:
$ php artisan command:action [options]For example:
$ php artisan make:model Product -mThis command creates a Product model and, thanks to the -m suffix, also automatically generates its associated migration file. That straightforward.
3. Most used Artisan commands in Laravel
Below are the Artisan commands you will use the most on a daily basis. I recommend reading them several times until you get familiar with them; with practice, you will internalize them effortlessly:
php artisan make:controller: Creates a new controller inapp/Http/Controllers.php artisan make:migration: Generates a migration file to define or modify database tables.php artisan migrate: Runs pending migrations. It has very useful variants likemigrate:rollbackto undo the last batch of migrations.php artisan make:model: Generates an Eloquent model. Combined with the-mfoption, it also creates the migration and factory all at once.
Commands to manage processes:
php artisan serve: starts a development server athttp://localhost:8000(useful if you don't use Apache or Nginx locally).php artisan migrate: runs all pending migrations.php artisan db:seed: inserts test data defined in the seeders.php artisan cache:clear: clears the application cache. Simple and a lifesaver.
Commands to get information:
php artisan list: displays all available commands, grouped by category.php artisan route:list: displays all routes registered in the application, including HTTP method, URI, name, and associated controller.php artisan config:show: displays the values of a specific configuration, for examplephp artisan config:show database.
Don't worry if you don't understand the purpose of each one right now; later we will look in detail at how each element works when we need it in the right context.
4. Creating your own custom Artisan commands
One of Artisan's most powerful features is that you can create your own commands to automate any specific process in your application: clearing temporary files, syncing data with an external API, sending scheduled notifications, etc.
Structure of a custom command
To generate the base class for your command, run:
$ php artisan make:command CommandNameThis automatically creates a new class inside app/Console/Commands, ready for you to define the command's signature (its name in the terminal) and the logic it will execute.
Practical example: clearing old logs
Imagine you need to delete old logs periodically. First, you generate the command:
$ php artisan make:command CleanLogsThen, in the handle() method of the generated class, you add the logic:
public function handle() {
    File::cleanDirectory(storage_path('logs'));
    $this->info('Logs cleaned successfully.');
}
And you can now run it from the terminal whenever you need it:
$ php artisan clean:logsBest practices when creating custom commands
Use descriptive names for your commands (for example, sync:users or export:orders), so anyone running php artisan list can understand at a glance what each one does.
Add feedback messages with $this->info() to indicate the result, and use $this->error() when something fails. This makes your commands much more informative in production.
Document each custom command in your README or project wiki, especially if working in a team.
In my case, I have custom commands that sync users or clear specific caches periodically. It is an excellent way to save time and standardize repetitive tasks that would otherwise have to be done manually.
Artisan commands are a command-line tool included in Laravel that are extremely useful during development. Their purpose is quite broad: creating controllers, components, models, test data, database migrations (to create, modify, or drop tables), running automated tests, and a long list of others. Even third-party packages for Laravel can register their own Artisan commands when installed.
Useful Artisan commands
Some of the most used commands are:
php artisan make:model: Creates a new Eloquent model.php artisan make:controller: Creates a new HTTP controller.php artisan make:migration: Creates a new database migration file.php artisan migrate: Runs pending migrations.
With this, we can appreciate the real power of Artisan: instead of manually creating a PHP file, defining the class, adding imports, and structuring it correctly, you just run a command and the framework generates all of that for you.
This naturally leads us to creating custom commands, which is a surprisingly simple process. Creating your own commands is key to automating any kind of recurring operation in your application: just like make:controller generates a controller, you can create commands that execute any process you need. In this post, as an example, we are going to create a user directly from a custom Artisan command.
Creating the class for our custom command
Artisan includes a specific command to generate the base class of the command you want to create. For the user example, we run:
php artisan make:command CreateUserCommandThis automatically generates a new file in app/Console/Commands. As you can guess, that file corresponds to a class with a predefined structure that we must complete.
Generating the logic of our command
The generated file consists of four fundamental parts:
- The class constructor: where we can inject dependencies or initialize data.
- The
handle()method: here we define the command's logic; in our case, creating a user. - The
$signatureproperty: defines the name with which the command will be invoked from the terminal. - The
$descriptionproperty: a short description that appears when runningphp artisan list, to make it clear what the command does.
Our complete file would look like this, importing the User model to create the user:
 <?php
namespace App\Console\Commands;
use App\Models\User;
use Illuminate\Support\Str;
use Illuminate\Console\Command;
class CreateUserCommand extends Command
{
    /**
     * The name and signature of the console command.
     *
     * @var string
     */
    protected $signature = 'user:create';
    /**
     * The console command description.
     *
     * @var string
     */
    protected $description = 'Command to create users *-*';
    /**
     * Create a new command instance.
     *
     * @return void
     */
    public function __construct()
    {
        parent::__construct();
    }
    /**
     * Execute the console command.
     *
     * @return int
     */
    public function handle()
    {
        User::create([
            'name' => Str::random(8),
            'email' => Str::random(8).'@gmail.com',
            'password' => Str::random(12),
        ]);
        return 0;
    }
}
If we now run:
$ php artisan listWe will see our new command listed along with the rest:
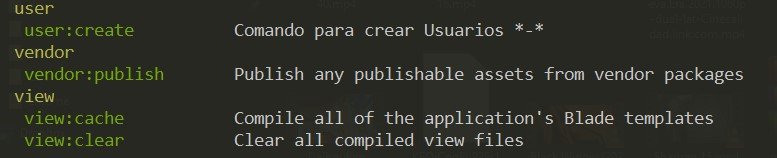
And if we run it:
php artisan user:createIn the database, we will see the result: a new user created.
Optional parameters in commands
If you want an argument to be optional (for example, the password), just add a ? after the parameter name in the $signature:
protected $signature = 'user:create {name} {password?}';Named parameters (options)
You can also define named options, which are passed with the -- prefix when running the command. For example, to indicate whether the user should be verified or not:
php artisan user:create --name="andres"To enable this option in the command signature, you define it with -- followed by the name and an equals sign; if the parameter is named verified:
protected $signature = 'user:create {--verified=} {name} {password?}';With all this, the final code of the handle() method would look like this:
  protected $signature = 'user:create {--verified=} {name} {password?}';


      $name = $this->argument('name');
        $password = $this->argument('password');
        $email_verified_at = $this->option('verified') ? now() : null;
        User::create([
            'name' => $name ?? Str::random(8),
            'email' => Str::random(8).'@gmail.com',
            'password' => bcrypt($password  ??  Str::random(12)),
            'email_verified_at' => $email_verified_at,
        ]);
5. Artisan commands to optimize your Laravel application
As your project grows, Artisan also becomes your ally to maintain good performance. These are the commands I use the most in production environments:
Clear cache and configuration
$ php artisan cache:clear
$ php artisan config:clear
$ php artisan route:clear
$ php artisan view:clear
These commands delete temporary files that can cause unexpected behavior, especially after deployments or configuration changes.
Optimize routes and autoload for production
$ php artisan route:cache
$ php artisan config:cache
$ composer dump-autoload -o
These commands compile routes and configurations into static files so that Laravel doesn't have to rebuild them on every request. The result is a noticeably faster application in production.
Restart queue workers
When changing code in production, if you use queue jobs (Queue), the workers running in the background do not automatically reload the new code. For them to do so without manually restarting the server, you run:
$ php artisan queue:restart
This command has saved me in more than one continuous deployment.
6. Project routes with Artisan
To inspect all registered routes in your Laravel project, use:
php artisan route:listOr its shortened version:
php artisan r:lView only your application routes (excluding third-party ones)
When you install packages like Telescope, Horizon, or Fortify, they register their own routes and can clutter the listing. To view only your application's routes, add the --except-vendor option:
php artisan route:list --except-vendorThis gives you a clean listing, without the routes generated by third-party packages.
7. Common errors and how to solve them with Artisan
Artisan does not recognize a command
If you get an error like Command not defined, it is very likely that PHP's autoloader is not up to date. Run:
$ composer dump-autoload
$ php artisan optimize:clear
Issues with migrations or seeds
Sometimes the database gets out of sync with migrations (for example, if you modified an already executed migration). The quickest solution in development is to recreate the entire structure:
$ php artisan migrate:fresh --seedThis deletes all tables, runs migrations from scratch, and repopulates the database with seeders. Use with caution in production: you will lose all data.
Quick fix: cache:clear
Before despairing over a mysterious error, always try this:
$ php artisan cache:clearPersonally, it has solved dozens of strange errors that had no apparent explanation. It is the equivalent of the classic "have you turned it off and on again?"
8. Summary of essential Artisan commands
What you learned about Artisan in Laravel
Artisan is much more than a simple command executor.
It allows you to automate, optimize, and maintain your Laravel application from the terminal in a clean, fast, and repeatable way.
Don't worry if you don't remember all the commands at first.
With daily use, you will internalize them naturally. In my experience, constant practice is the best teacher.
| Category | Command | Action |
|---|---|---|
| Generation | make:model [Name] -m | Creates the model and its associated migration. |
| Generation | make:controller [Name] | Generates a new controller. |
| Database | migrate | Runs pending migrations. |
| Database | migrate:fresh --seed | Resets the DB and loads seeders. |
| Optimization | optimize:clear | Clears all framework caches. |
| Information | route:list --except-vendor | Lists only your custom routes. |
| Queues | queue:restart | Restarts queue workers without losing jobs. |
| Custom Commands | make:command CommandName | Generates the base class for a custom command. |
Frequently asked questions about Artisan in Laravel
- What is Artisan and what is it used for?
- It is Laravel's command-line interface (CLI), used to create framework files, run maintenance tasks, and manage the application without a graphical interface.
- What are the most used Artisan commands?
make:controller,migrate,serve,route:list,cache:clear, anddb:seed.
- How do I create a custom command in Artisan?
- With
php artisan make:command CommandNameand defining the logic in thehandle()method of the generated class.
- With
- What is the difference between
php artisanandsail artisan?- The former uses PHP installed on your local machine; the latter runs Artisan inside Laravel Sail's Docker container. The result is identical, only the environment changes.
- How to clear the application cache?
- Run
php artisan cache:clearfor the application cache, orphp artisan optimize:clearto clear all framework caches at once.
- Run
- How can I learn more about a specific command?
- Run
php artisan help [command-name]to see all its available options and arguments. It is the fastest way to be self-taught with Artisan.
- Run
- I see the
Command not founderror or problems with the PHP version.- It is almost certain that you need to use
./vendor/bin/sail artisaninstead ofphp artisan, because your development environment runs inside Docker with Laravel Sail.
- It is almost certain that you need to use
The next step is to keep advancing with the framework and learn how to implement file upload or file handling in Laravel.