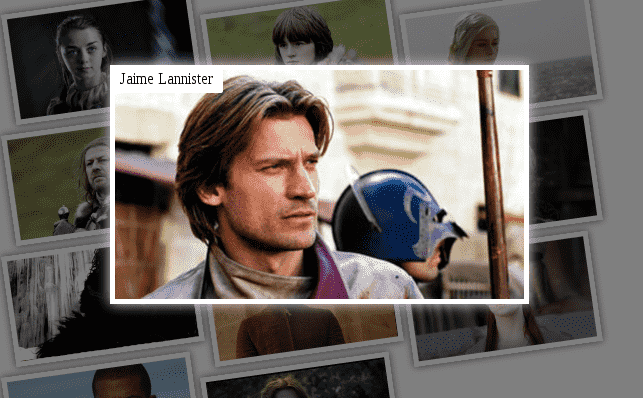
In this post we will explain how to create a simple gallery using CSS and six (6) lines of JavaScript.
In this post we will see how to create a simple gallery with CSS and just six (6) lines of JavaScript; in previous posts we already gave some experiments on galleries:
- ¿Cómo hacer una simple galería responsive con CSS 1?
- ¿Cómo hacer una simple galería responsive con CSS 2?
Although much of the CSS and HTML code is the same used in the previous experiments, new modifications have been incorporated, such as the incorporation of six (6) lines of JavaScript to create an "open an image" effect when selecting it:
Let's look at the table of contents for this post:
Defining the structure (HTML)
We define the basic structure that the gallery will have; In other words, the HTML:
<div id="container">
<div onclick="galery(this)">
<img src="img/arya-stark.jpg"/>
<span>Arya Stark</span>
</div>
.
.
.
<div onclick="galery(this)">
<img src="Imagen"/>
<span>Descripción</span>
</div>
</div>
If you have read some of the previous posts on how to create a gallery, you will notice that the HTML structure has not changed at all except for the incorporation of the onclick attribute that invokes the JavaScript function that we will see below.
Defining JavaScript
As mentioned in the title and introduction of this entry: with only 6 lines we can create the effect that when selecting an image it "opens" or, in other words, it occupies the center of the screen in a larger area. proportion; Essentially the JavaScript adds and removes a class called select which centers the image in the middle of the screen:
function galery(e){
    if(e.classList.length == 0)
    e.classList.add("select")
    else
    e.classList.remove("select")
}
Defining the Style (CSS)
The style sheet is one of the aspects that has changed the most compared to previous entries; let's explain the main rules:
Positioning of images (position: relative/fixed)
One of the changes that is presented is the incorporation of the position property to alter the flow of positioning of HTML elements such as images:
#container div{
    position: relative;
    transition: width 1s, width 1s, top 1s;
    z-index:1;
    /*mas CSS*/
}
Furthermore, the incorporation of Transitions for smooth changes between one state and another; the idea is to gently place the selected image in the center of the screen at a larger size when detecting a click on it using JavaScript that adds the select class:
#container div.select{
    position: fixed;
    width: 100%;
    height: 100%;
    top: 0;
    left:0;
    z-index:5;
}
In other words, by incorporating the select class, the transition defined in the CSS between other properties is automatically activated.
A key factor here is the position: fixed; to place the image absolutely centered on the screen and independent of the rest of the content.
We also modify the left margin of the image adjacent to the selected image:
#container div.select + div{
    margin: 5px 3% 5px 31%;
}
The value 31% is the sum of the right margin (3%) plus the size of the image container (28%); this prevents the adjacent element from taking the place of the selected image and altering the behavior of the entire gallery; as we exemplify in the following video:
You can find the complete demo in the following links:
