
Content Index
- The Modern Approach: Jetpack Compose (Composable)
- Drawing with Canvas in Jetpack Compose
- Drawing our first figure with Canvas, a face
- Fundamental Concepts: Dimensions and Area
- Drawing our first figure
- 1. The Base Circle
- 2. Outlines with Stroke
- Transformations: Offset, Translate, and Arcs
- The Arc (DrawArc)
- Real Example: Statistics Bars (Stats)
- Starting with Canvas in Android -the onDraw() method- Legacy Way
- The onDraw() method
- Drawing a figure:
- Associating the Canvas in the activity
- Draw graphics inside the layouts or on the Canvas?
- Drawing a custom SeekBar in Android with Canvas
- Defining the bases: the structure of the activity
- The SeekBarView class to draw the SeekBar using Canvas
This article describes the method we will use to present the modern alternative, Jetpack Compose, which uses a "composable" approach for faster and simpler UI development, and at the end, the traditional way (now considered "Legacy") to create custom graphics in Android using the View and Canvas system. While this approach is still functional, modern Android development has evolved.
A Canvas is nothing more than a surface on which you can draw; with the help of the primitives offered by the Canvas API in Android, it is possible to draw graphics such as lines, circles, ovals, squares, rectangles, and even text, as well as vary the color, stroke, and size. In this post, we will take the first steps with the Canvas class in Android.
Previously, we saw how to make an internet connection in Android Studio with Retrofit, which we will improve at the end to show a power bar.
The Modern Approach: Jetpack Compose (Composable)
The way user interfaces are built in Android has evolved. The way we have seen, using Views and XML, is the traditional or "Legacy" approach. The new way, recommended by Google, is to use Jetpack Compose.
Drawing with Canvas in Jetpack Compose
The concept of Canvas still exists in Jetpack Compose, but it is used in a more direct and declarative way within a Composable function. It is not necessary to create a new class or override onDraw.
For example, to draw a circle, we simply use the Canvas Composable:
@Composable
fun MyCircle() {
    Canvas(modifier = Modifier.fillMaxSize()) {
        val center = Offset(x = size.width / 2, y = size.height / 2)
        drawCircle(
            color = Color.Blue,
            radius = 100f,
            center = center
        )
    }
}
As you can see, the code is more concise and integrates naturally with the rest of the declarative UI of Compose. This is the new standard for UI development in Android, offering faster and more efficient development.
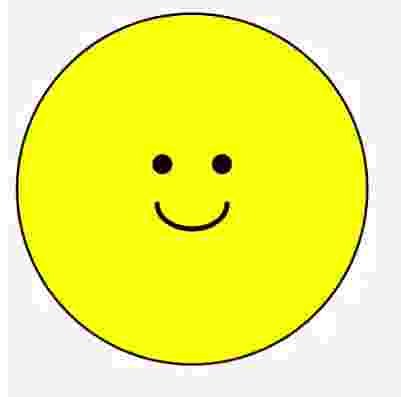
Drawing our first figure with Canvas, a face
We are going to learn the basics of working with Canvas in Android using Composables. The first thing you should know is that the Canvas is not intended for static or simple figures that you could achieve with other components; its true potential lies in the creation of complex figures and, above all, in the implementation of advanced animations.
Although people sometimes shy away from it because of the mathematical component, it is actually based on basic operations that we have known since we were children: circles, squares, rectangles, triangles, arcs, and polygons.
Fundamental Concepts: Dimensions and Area
To draw, we just need to remember how the dimensions of each figure vary:
- Circle: It is defined by its radius. It is the distance from the center to the edge. The larger this number, the larger the circle will be.
- Square: By definition, all its sides measure the same (equal height and width).
- Rectangle: It varies in both its height and its width.
Color is the simplest aspect: if you want a yellow circle, you simply select that color on the brush and draw it.
Drawing our first figure
The Canvas is, essentially, a blank canvas at our disposal. In the code, we declare the Canvas Composable, assign it a size (for example, 300 dp) and a padding so that it is not stuck to the edges:
@Composable
fun MyCustomDrawing() {
    Canvas(
        modifier = Modifier
            .size(300.dp)
            .padding(16.dp)
    ) {
        // 1. Draw the face (Yellow Circle)
        drawCircle(
            color = Color.Yellow,
            radius = size.minDimension / 2,
            center = center // 'center' is an automatic property of the Canvas
        )
        // 2. Draw the outline of the face
        drawCircle(
            color = Color.Black,
            radius = size.minDimension / 2,
            style = Stroke(width = 5f) // Only the border
        )
        // 3. Draw the eyes
        val eyeRadius = 20f
        drawCircle(
            color = Color.Black,
            radius = eyeRadius,
            center = Offset(center.x - 60f, center.y - 50f)
        )
        drawCircle(
            color = Color.Black,
            radius = eyeRadius,
            center = Offset(center.x + 60f, center.y - 50f)
        )
        // 4. Draw the smile (an arc)
        drawArc(
            color = Color.Black,
            startAngle = 0f,    // Starts on the right (3 on a clock)
            sweepAngle = 180f,  // Rotates 180 degrees downwards
            useCenter = false,  // If true, closes the arc towards the center (like a Pacman)
            topLeft = Offset(center.x - 70f, center.y - 20f),
            size = Size(140f, 100f),
            style = Stroke(width = 10f, cap = StrokeCap.Round)
        )
    }
}
1. The Base Circle
Inside the Canvas, we have access to free properties like size (total dimensions) and center (the midpoint).
- Radius: If the size of the Canvas is 300, we divide by two to get the radius so that the circle occupies the space perfectly from the center.
- Position: We use center to automatically place it in the middle of the canvas.
@Composable
fun MyCustomDrawing() {
    Canvas(
        modifier = Modifier
            .size(300.dp)
            .padding(16.dp)
    ) {
        // 1. Draw the face (Yellow Circle)
        drawCircle(
            color = Color.Yellow,
            radius = size.minDimension / 2,
            center = center // 'center' is an automatic property of the Canvas
        )
}
2. Outlines with Stroke
If we want to draw only the border of a figure without filling it, we use the Stroke style.
- Filled Circle: This is the default behavior.
- Outline Circle: By indicating style = Stroke(width = 10f), the circle will be hollow and we will only see the outer line.
@Composable
fun MyCustomDrawing() {
    Canvas(
        modifier = Modifier
            .size(300.dp)
            .padding(16.dp)
    ) {
        // 1. Draw the face (Yellow Circle)
        drawCircle(
            color = Color.Yellow,
            radius = size.minDimension / 2,
            center = center // 'center' is an automatic property of the Canvas
        )
        // 2. Draw the outline of the face
        drawCircle(
            color = Color.Black,
            radius = size.minDimension / 2,
            style = Stroke(width = 5f) // Only the border
        )
}
Transformations: Offset, Translate, and Arcs
To move figures, we use the Offset (displacement in X and Y). There are also metric operations such as rotation, scaling, and translation. This is very similar to what is done in 2D or even 3D environments like Blender: it's all a matter of declaring sizes, colors, and positions.
@Composable
fun MyCustomDrawing() {
    Canvas(
        modifier = Modifier
            .size(300.dp)
            .padding(16.dp)
    ) {
        // 1. Draw the face (Yellow Circle)
        drawCircle(
            color = Color.Yellow,
            radius = size.minDimension / 2,
            center = center // 'center' is an automatic property of the Canvas
        )
        // 2. Draw the outline of the face
        drawCircle(
            color = Color.Black,
            radius = size.minDimension / 2,
            style = Stroke(width = 5f) // Only the border
        )
        // 3. Draw the eyes
        val eyeRadius = 20f
        drawCircle(
            color = Color.Black,
            radius = eyeRadius,
            center = Offset(center.x - 60f, center.y - 50f)
        )
        drawCircle(
            color = Color.Black,
            radius = eyeRadius,
            center = Offset(center.x + 60f, center.y - 50f)
        )
}
The Arc (DrawArc)
For shapes that are not closed, like a smile, we use drawArc. It is a bit more complex because it requires:
- startAngle: Where the drawing begins (in degrees).
- sweepAngle: How much it extends (for example, 180° for a semicircle).
- useCenter: To decide if the arc closes towards the center or if only the curved line remains.
@Composable
fun MyCustomDrawing() {
    Canvas(
        modifier = Modifier
            .size(300.dp)
            .padding(16.dp)
    ) {
        // 1. Draw the face (Yellow Circle)
        drawCircle(
            color = Color.Yellow,
            radius = size.minDimension / 2,
            center = center // 'center' is an automatic property of the Canvas
        )
        // 2. Draw the outline of the face
        drawCircle(
            color = Color.Black,
            radius = size.minDimension / 2,
            style = Stroke(width = 5f) // Only the border
        )
        // 3. Draw the eyes
        val eyeRadius = 20f
        drawCircle(
            color = Color.Black,
            radius = eyeRadius,
            center = Offset(center.x - 60f, center.y - 50f)
        )
        drawCircle(
            color = Color.Black,
            radius = eyeRadius,
            center = Offset(center.x + 60f, center.y - 50f)
        )
        // 4. Draw the smile (an arc)
        drawArc(
            color = Color.Black,
            startAngle = 0f,    // Starts on the right (3 on a clock)
            sweepAngle = 180f,  // Rotates 180 degrees downwards
            useCenter = false,  // If true, closes the arc towards the center (like a Pacman)
            topLeft = Offset(center.x - 70f, center.y - 20f),
            size = Size(140f, 100f),
            style = Stroke(width = 10f, cap = StrokeCap.Round)
        )
    }
}
And with this, we get:
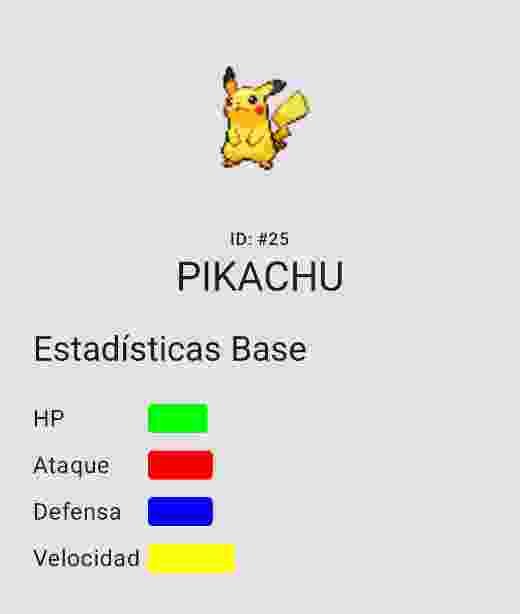
Real Example: Statistics Bars (Stats)
To see something more useful than a static face, we can create progress bars for a Pokémon. Here we no longer use circles, but rectangles with rounded corners (drawRoundRect).
The logical flow is as follows:
- Background: We draw a gray rectangle that occupies the entire width (fillMaxWidth) to represent the maximum value (e.g., 255).
- Progress: We calculate a mathematical proportion: (currentValue / maxValue) * totalWidth.
- Top Layer: We draw a second rectangle on top with the corresponding color (red, green, blue) based on the previous calculation.
data class Stat(
    val name: String,
    val value: Int,
    val color: Color
)
val myStats = listOf(
    Stat("HP", 45, Color.Green),
    Stat("Attack", 49, Color.Red),
    Stat("Defense", 49, Color.Blue),
    Stat("Speed", 65, Color.Yellow)
)
***
@Composable
fun PokemonStatsChart(stats: List<Stat>) {
    Column(
        modifier = Modifier
            .fillMaxWidth()
            .padding(16.dp)
    ) {
        Text(
            text = "Base Statistics",
            style = MaterialTheme.typography.headlineSmall,
            modifier = Modifier.padding(bottom = 16.dp)
        )
        stats.forEach { stat ->
            Row(
                verticalAlignment = Alignment.CenterVertically,
                modifier = Modifier.padding(vertical = 4.dp)
            ) {
                // Stat name
                Text(text = stat.name, modifier = Modifier.width(80.dp))
                // The Canvas where we draw the bar
                Canvas(
                    modifier = Modifier
                        .fillMaxWidth()
                        .height(20.dp)
                ) {
                    val maxStat = 255f
                    // We calculate the width proportional to the size of the Canvas
                    val progressWidth = (stat.value / maxStat) * size.width
                    // 1. Draw the background of the bar (light gray)
                    drawRoundRect(
                        color = Color.LightGray.copy(alpha = 0.3f),
                        size = size,
                        cornerRadius = CornerRadius(10f, 10f)
                    )
                    // 2. Draw the progress bar (the actual stat)
                    drawRoundRect(
                        color = stat.color,
                        size = Size(width = progressWidth, height = size.height),
                        cornerRadius = CornerRadius(10f, 10f)
                    )
                }
            }
        }
    }
}
As you can see, the Canvas gives us absolute freedom to create components that do not exist by default in the Android library. All this source code is available in the repository so you can experiment with the positions and colors:
Starting with Canvas in Android -the onDraw() method- Legacy Way
First, you have to define a class that extends from View, which can be contained within the same activity or outside of it. We will call the class MyView and it will override the onDraw(Canvas) method:
	public class MyView extends View {
		public MyView(Context context) {
			super(context);
		}
		@Override
		protected void onDraw(Canvas canvas) {
		}
	}
The onDraw() method
The onDraw(Canvas canvas) method specifies a Canvas parameter whose class is the one that allows drawing primitives: lines, circles, rectangles, etc.
Drawing a figure:
To draw a simple figure, we must specify a series of methods along with their parameters to change the style of the strokes, colors, shapes, etc:
- Define a paint to specify parameters such as color, stroke thickness, etc. Let's see some of them:
Paint.setColor: Sets a color to paint; the method receives a color type parameter; for example:Color.WHITEPaint.setStyle: Sets a style for painting; the method receives a parameter of typePaint.Stylewhich can be:- FILL: Draws a filled figure:
- STROKE: Draws only the outline of the figure:
- FILL_AND_STROKE: Combination of the two previous ones.
- The Canvas defines the colors and geometric shapes to be drawn:
Canvas.drawColor(): Defines a color.Canvas.drawCircle(X,Y,Radius,Paint): Draws a circle according to: The specified position (X and Y), radius (Radius), and Paint.Canvas.drawLine(startX,startY,stopX,stopY,Paint): Draws a line according to the specified segment (startX,startY,stopX,stopY) and Paint.Canvas.drawRect(left, top, right, bottom, paint)): Draws a rectangle according to the specified position (left,top,right,bottom) and Paint.Canvas.drawPaint(Paint): Paints the entire Canvas according to the specified Paint.
Associating the Canvas in the activity
Once we have defined the view that will draw on the Canvas, the next step is to associate an instance of the MyView class in the activity using the setContentView() method:
setContentView(new MyView(this));When we want to draw graphics in Android, we can do it within the view using a layout (the traditional way of referencing a layout in Android):
setContentView(R.layout.activity_main);Or draw the graphics directly on a Canvas as we have done in this post:
setContentView(new MyView(this));As you can see, for both steps we use the setContentView() method but with very different results.
Draw graphics inside the layouts or on the Canvas?
It is recommended to draw the graphics in a layout when simple graphics with little movement are going to be handled; but, when you want to create richer graphics with more animations, movements, redrawing of the drawings, and higher performance, Android recommends using the Canvas instead.

Drawing a custom SeekBar in Android with Canvas
The SeekBar to be made is really simple, it only consists of a side bar (a flattened rectangle) and a circumference that will act as a control and is the one we will manipulate with a click or "gesture" to move it from right to left and vice versa.
Defining the bases: the structure of the activity
First we must define the structure of our activity, which is the one that will support the SeekBar drawn by Canvas in another class; in the layout of our activity we do very little; we simply define an empty layout like the following:
<?xml version="1.0" encoding="utf-8"?>
<LinearLayout xmlns:android="http://schemas.android.com/apk/res/android"
   xmlns:tools="http://schemas.android.com/tools"
   android:id="@+id/cons"
   android:layout_width="match_parent"
   android:layout_height="match_parent"
   android:orientation="vertical"
   tools:context="com.presentacion.desarrollolibre.audioplayer.MainActivity">
</LinearLayout>
We are already in charge from the activity of creating a FrameLayout with fixed dimensions of 300 x 300 using the following Java code:
SeekBarView seekBarView = new SeekBarView(MainActivity.this);
FrameLayout.LayoutParams myFrameLayoutParams = new FrameLayout.LayoutParams(300,300);
seekBarView.setLayoutParams(myFrameLayoutParams);
setContentView(seekBarView);
The SeekBarView class to draw the SeekBar using Canvas
As we will see in the experiment, the SeekBarView class extends the FrameLayout class and therefore must override certain methods of this class; in the constructor method of the class we are in charge of creating an object of type Paint that allows us to draw geometric shapes (our rectangle and circle) and draw it within a Canvas; in addition we define two variables with a fixed size that will serve us for another purpose:
thumbWidth = dp(24);
thumbHeight = dp(24);
These variables are in charge of defining the position of the rectangle that we draw with the onDraw() method of this SeekBarView class; the onDraw() method that we override, is in charge of creating the canvas and drawing the geometric figures (rectangle and circle) on our canvas:
canvas.drawRect(thumbWidth / 2, getMeasuredHeight() / 2 - dp(1), thumbWidth / 2 + thumbX, getMeasuredHeight() / 2 + dp(1), outerPaint1);
The getMeasuredHeight() method returns the length of the container that we define in the activity, which for this experiment is 300.
The getMeasuredWidth() method returns the width of the container that we define in the activity, which for this experiment is 300.
In addition to a bar that we draw with the previous function of drawRect, we draw a circle with the help of the drawCircle primitive.
canvas.drawCircle(thumbX + thumbWidth / 2, y + thumbHeight / 2, dp(pressed ? 8 : 6), outerPaint1);
Finally, an onTouch method is created that is executed to move the circle according to the user's touch on the Canvas (a kind of maintained onClick event). The onTouch method is quite interesting since the calculations are made to relocate the ball according to the update of the thumbX variable which is updated according to the position of the user's click on the SeekBar; the onTouch method is in charge of automatically calling the onDraw method and in this way the ball is redrawn according to the updated position:
boolean onTouch(MotionEvent ev) {
    if (ev.getAction() == MotionEvent.ACTION_DOWN) {
        getParent().requestDisallowInterceptTouchEvent(true);
        int additionWidth = (getMeasuredHeight() - thumbWidth) / 2;
        if (thumbX - additionWidth <= ev.getX() && ev.getX() <= thumbX + thumbWidth + additionWidth && ev.getY() >= 0 && ev.getY() <= getMeasuredHeight()) {
            pressed = true;
            thumbDX = (int) (ev.getX() - thumbX);
            invalidate();
            return true;
        }
    } else if (ev.getAction() == MotionEvent.ACTION_UP || ev.getAction() == MotionEvent.ACTION_CANCEL) {
        if (pressed) {
            if (ev.getAction() == MotionEvent.ACTION_UP) {
//                        onSeekBarDrag((float) thumbX / (float) (getMeasuredWidth() - thumbWidth));
            }
            pressed = false;
            invalidate();
            return true;
        }
    } else if (ev.getAction() == MotionEvent.ACTION_MOVE) {
        if (pressed) {
            thumbX = (int) (ev.getX() - thumbDX);
            if (thumbX < 0) {
                thumbX = 0;
            } else if (thumbX > getMeasuredWidth() - thumbWidth) {
                thumbX = getMeasuredWidth() - thumbWidth;
            }
            invalidate();
            return true;
        }
    }
    return false;
}
In the previous onTouch method there are several events for; we have the ACTION_DOWN constant that is executed at the moment of starting the "gesture" or the person's click on the Canvas and the ACTION_UP constant that is executed at the moment of finishing the "gesture" or the person's click on the Canvas.
As a result of these states, the thumbX variable is updated, which is the one that "moves" or allows redrawing the ball using the onDraw() method.
Next step, learn how to generate QR codes on Android with Compose.